How to Use QR Code Scanning to Check Guests In Like a Pro
Jul 7, 2026 · 10 min read
So you have an event coming up - maybe a concert in Lagos, a conference in Abuja, a comedy show on campus, or a church programme in Enugu - and you need to sell tickets online. You have come to the right place.
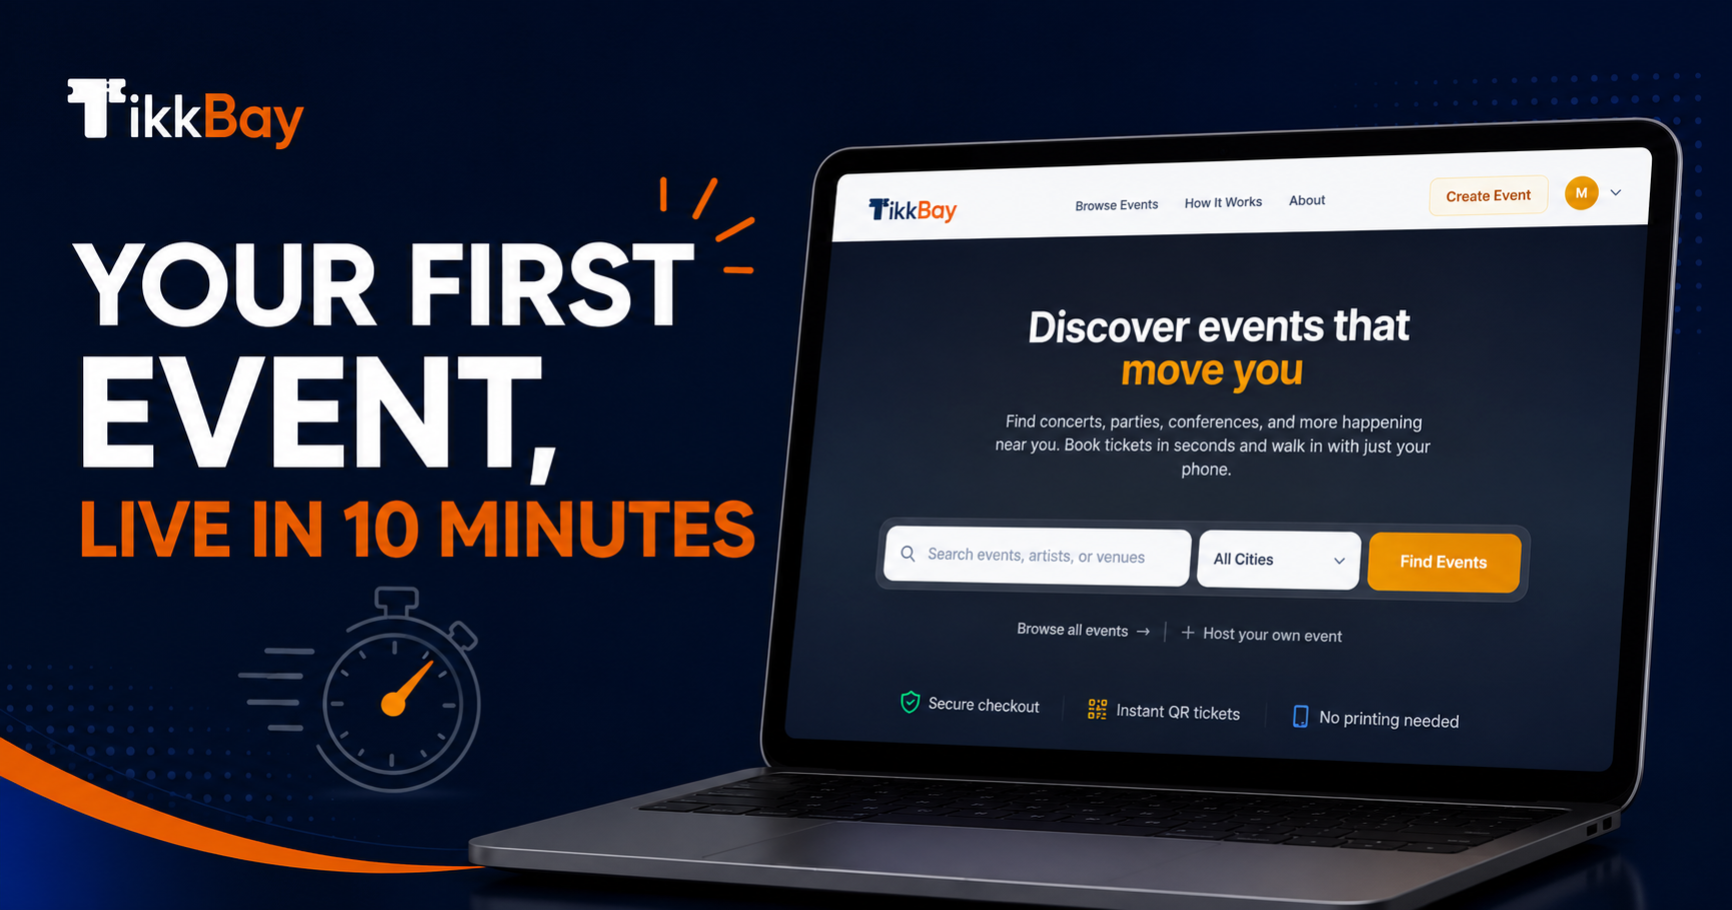
TikkBay is an event ticketing platform built for African event organisers. It handles everything from ticket sales and QR code scanning to payouts directly to your bank account. And the best part? You can go from zero to a live event page with tickets on sale in about 10 minutes.
This guide walks you through every step. No guesswork, no confusion. By the end, you will have a published event page that is ready to accept orders.
Let us get into it.
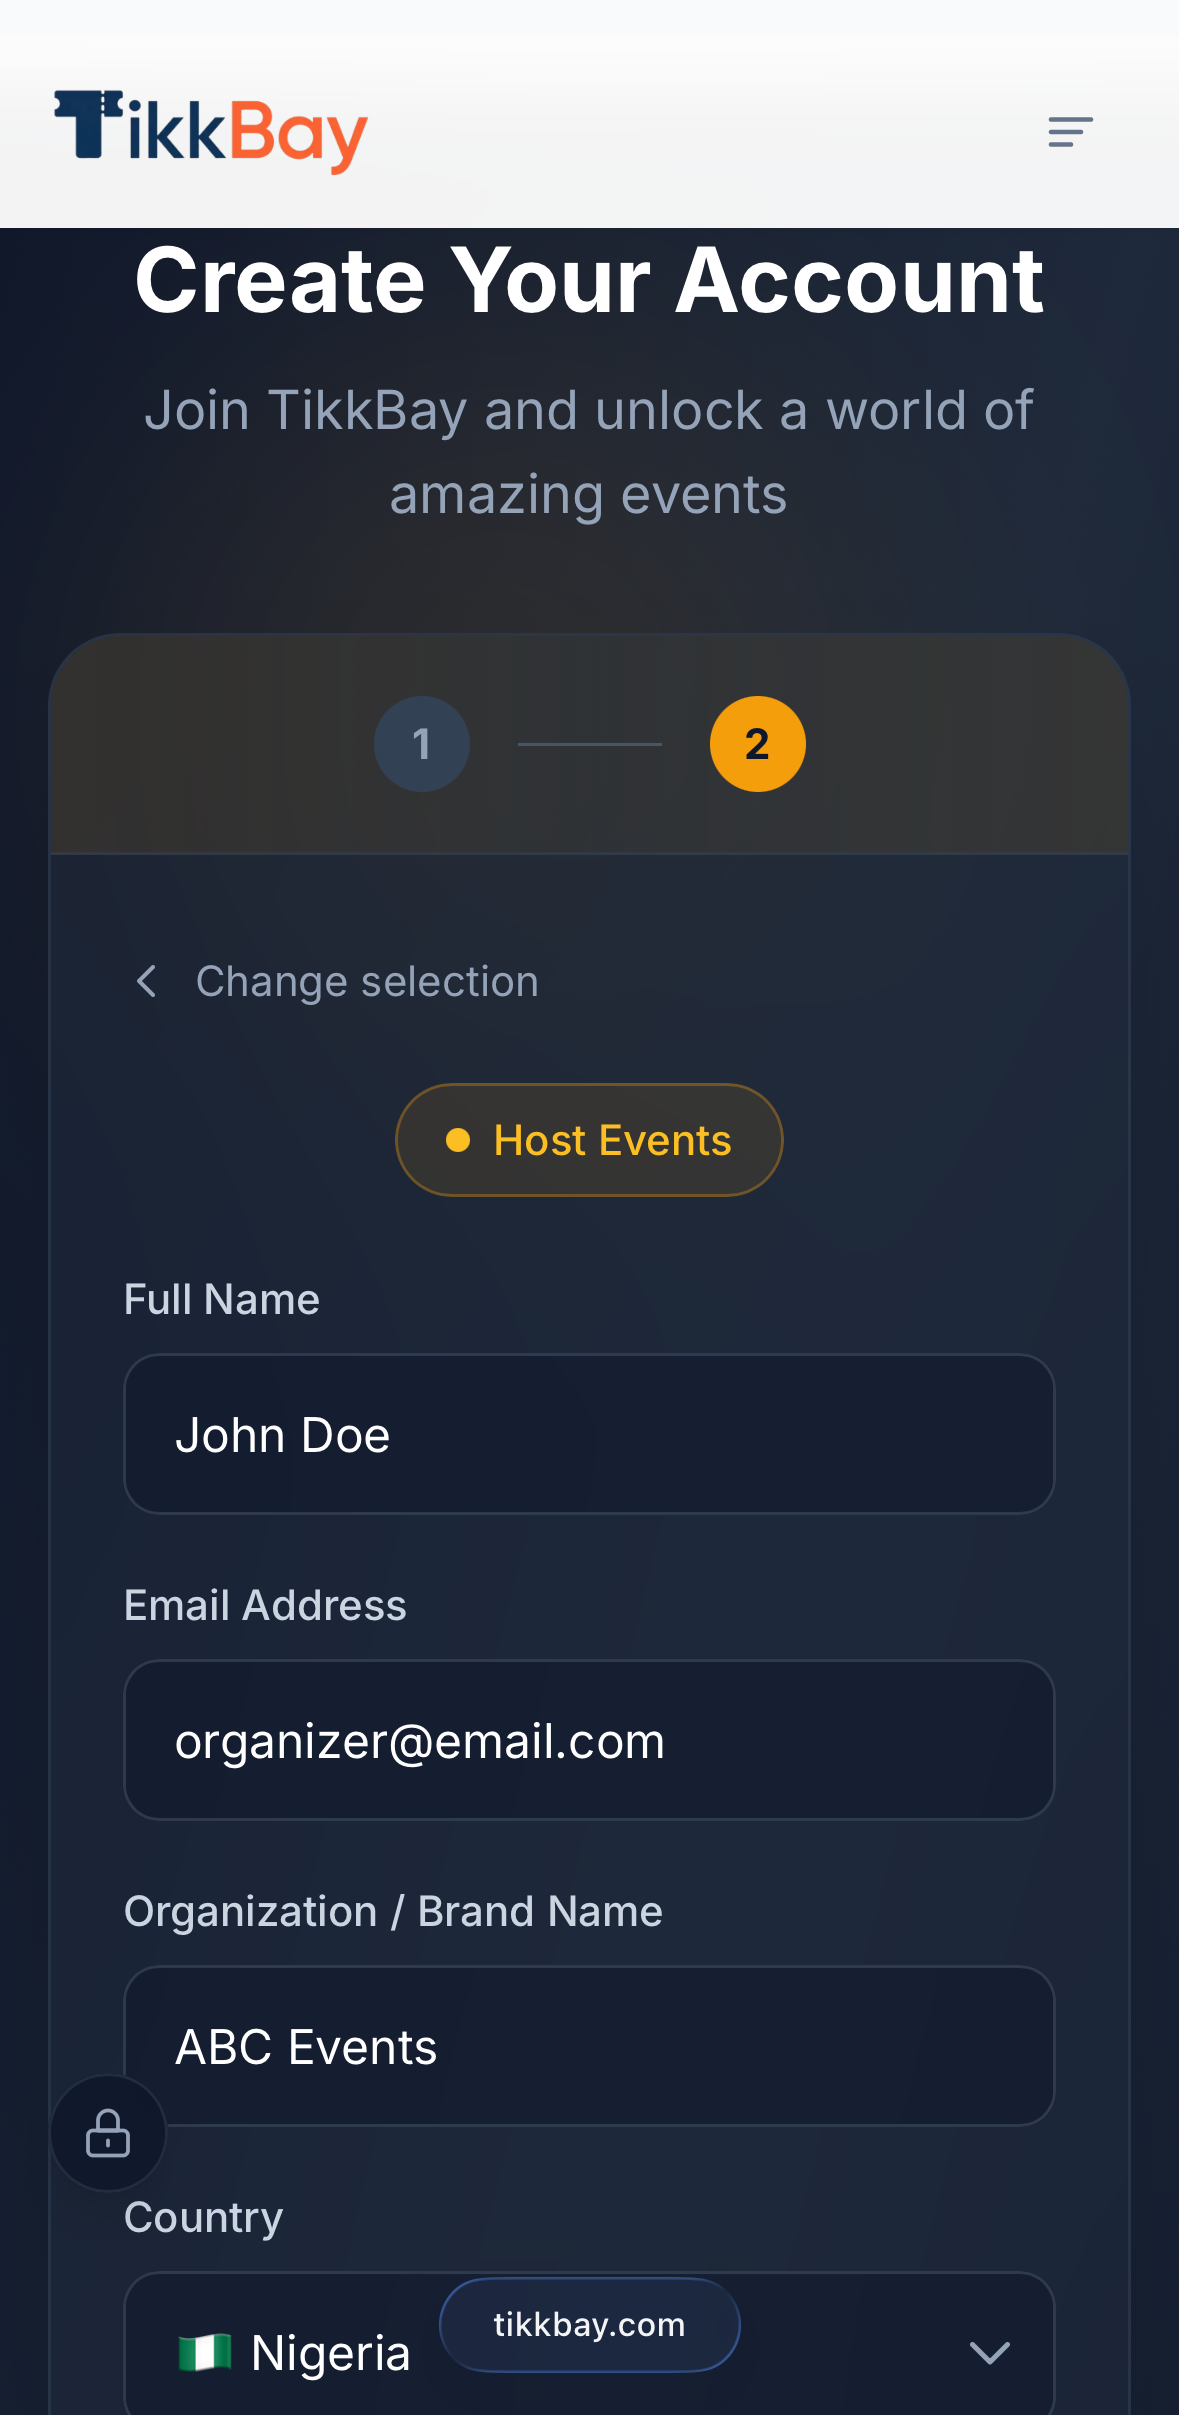
Head over to tikkbay.com and click the sign-up button.
You will need to provide your name, email address, and a password. During registration, TikkBay asks what you want to do on the platform. Select "Host Events (Organizer)" since you are here to sell tickets.
When you select the host option, two extra fields appear: your organisation name and your country. Your organisation name is what attendees will see as the event host - it could be your company name, brand name, or even your personal name. For country, TikkBay currently supports 14 African countries including Nigeria, Ghana, Kenya, South Africa, Tanzania, Uganda, Rwanda, and more.
After you submit, TikkBay sends a verification email. Click the link in that email and you are in. Your organiser profile is created automatically and set to active, so you can start creating events immediately.
Already have a TikkBay account? If you signed up previously to browse events, you do not need a new account. Just log in and click "Become a Host" from the menu. You will provide your organisation name and country, and your organiser profile will be created on the spot.
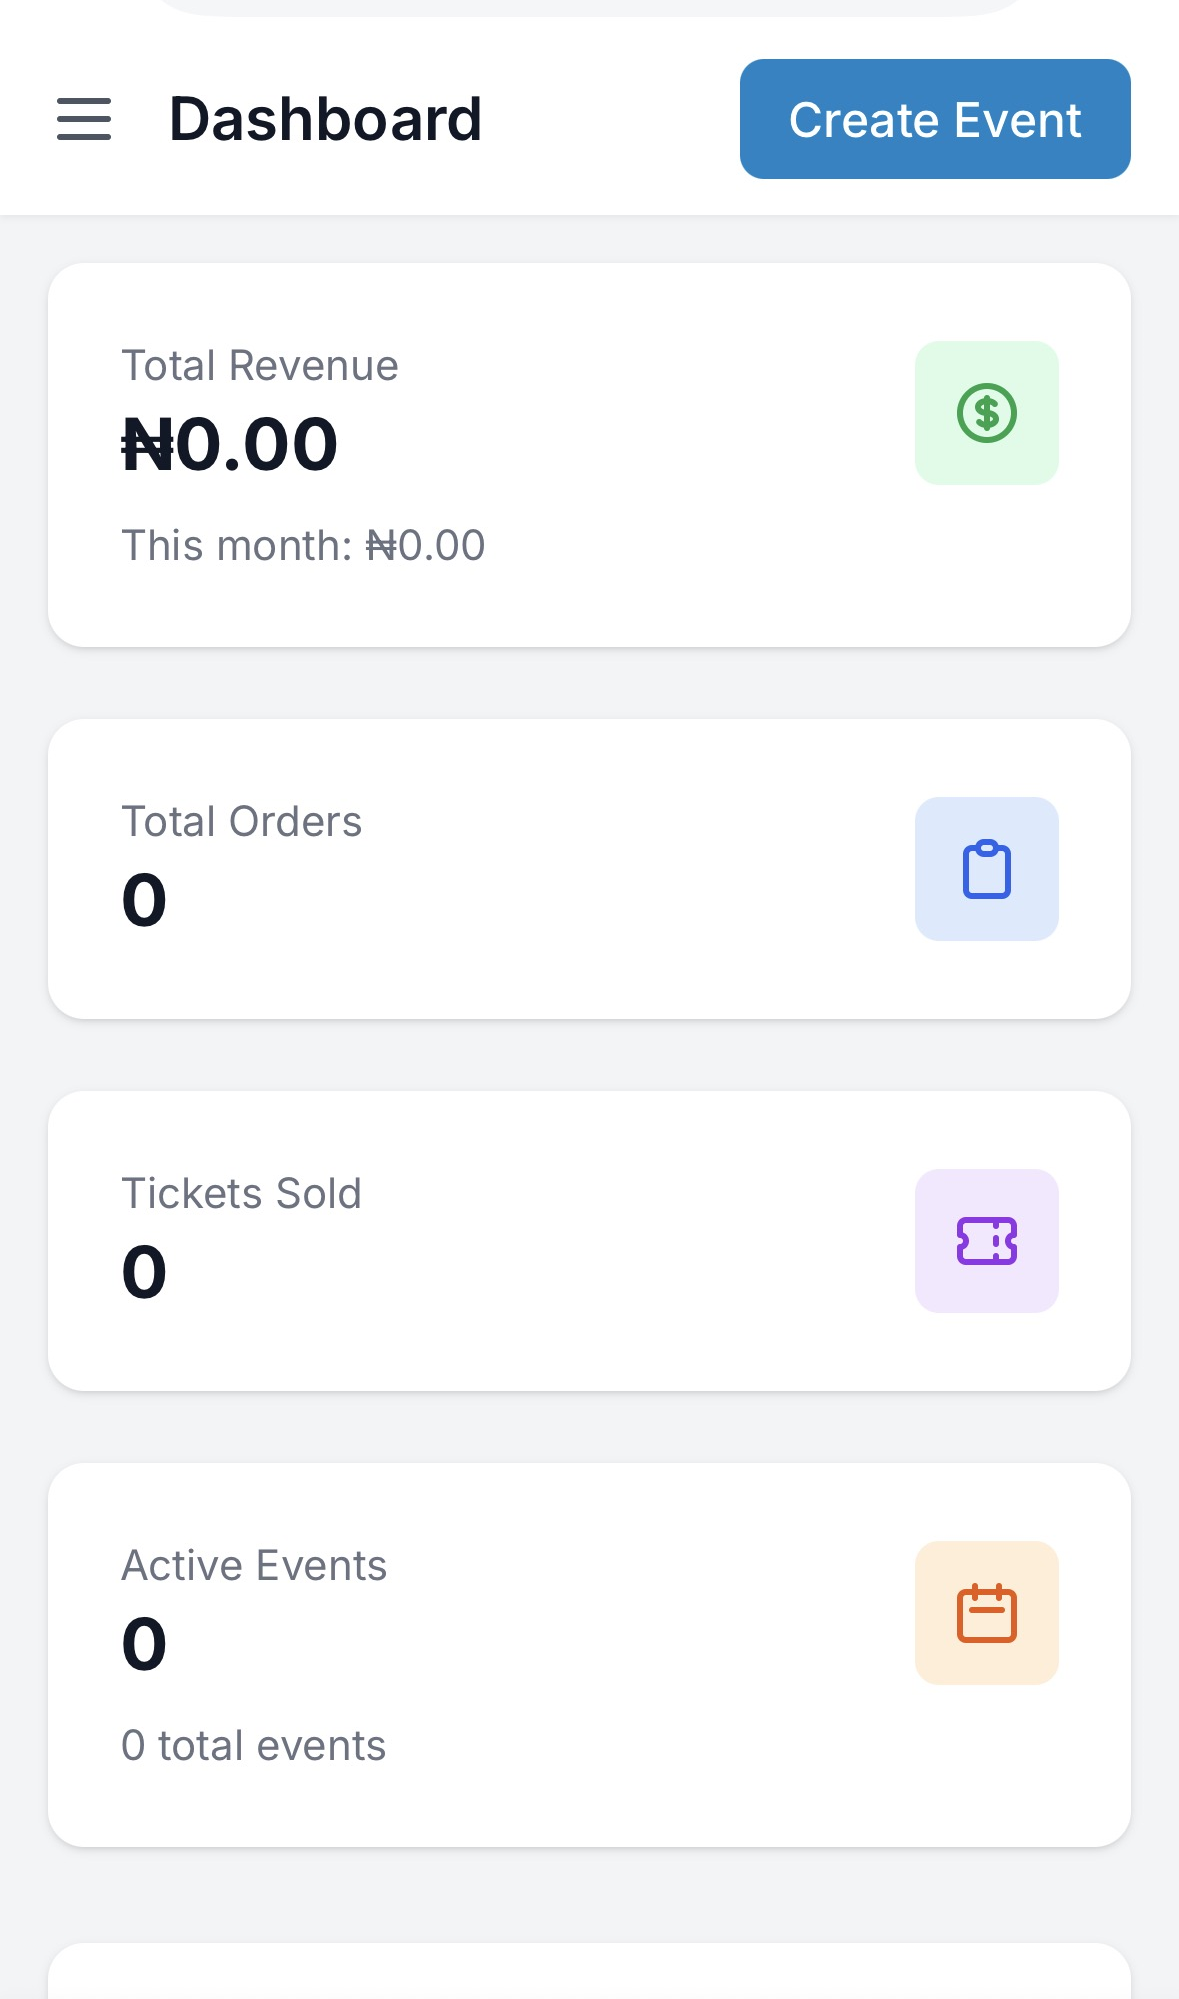
Once you verify your email and log in, TikkBay redirects you to your organiser dashboard. This is your command centre. From here you can see your total revenue, tickets sold, order count, and recent activity - though right now, everything will be at zero. That is about to change.
To create your first event, look for the "Create Event" button and click it.
The event creation form is where the magic happens. Let us go through each section.
Give your event a clear, descriptive title. This is the first thing potential attendees see, so make it count. Something like "Afrobeats Night Lagos - Live Music & Vibes" works better than just "My Event."
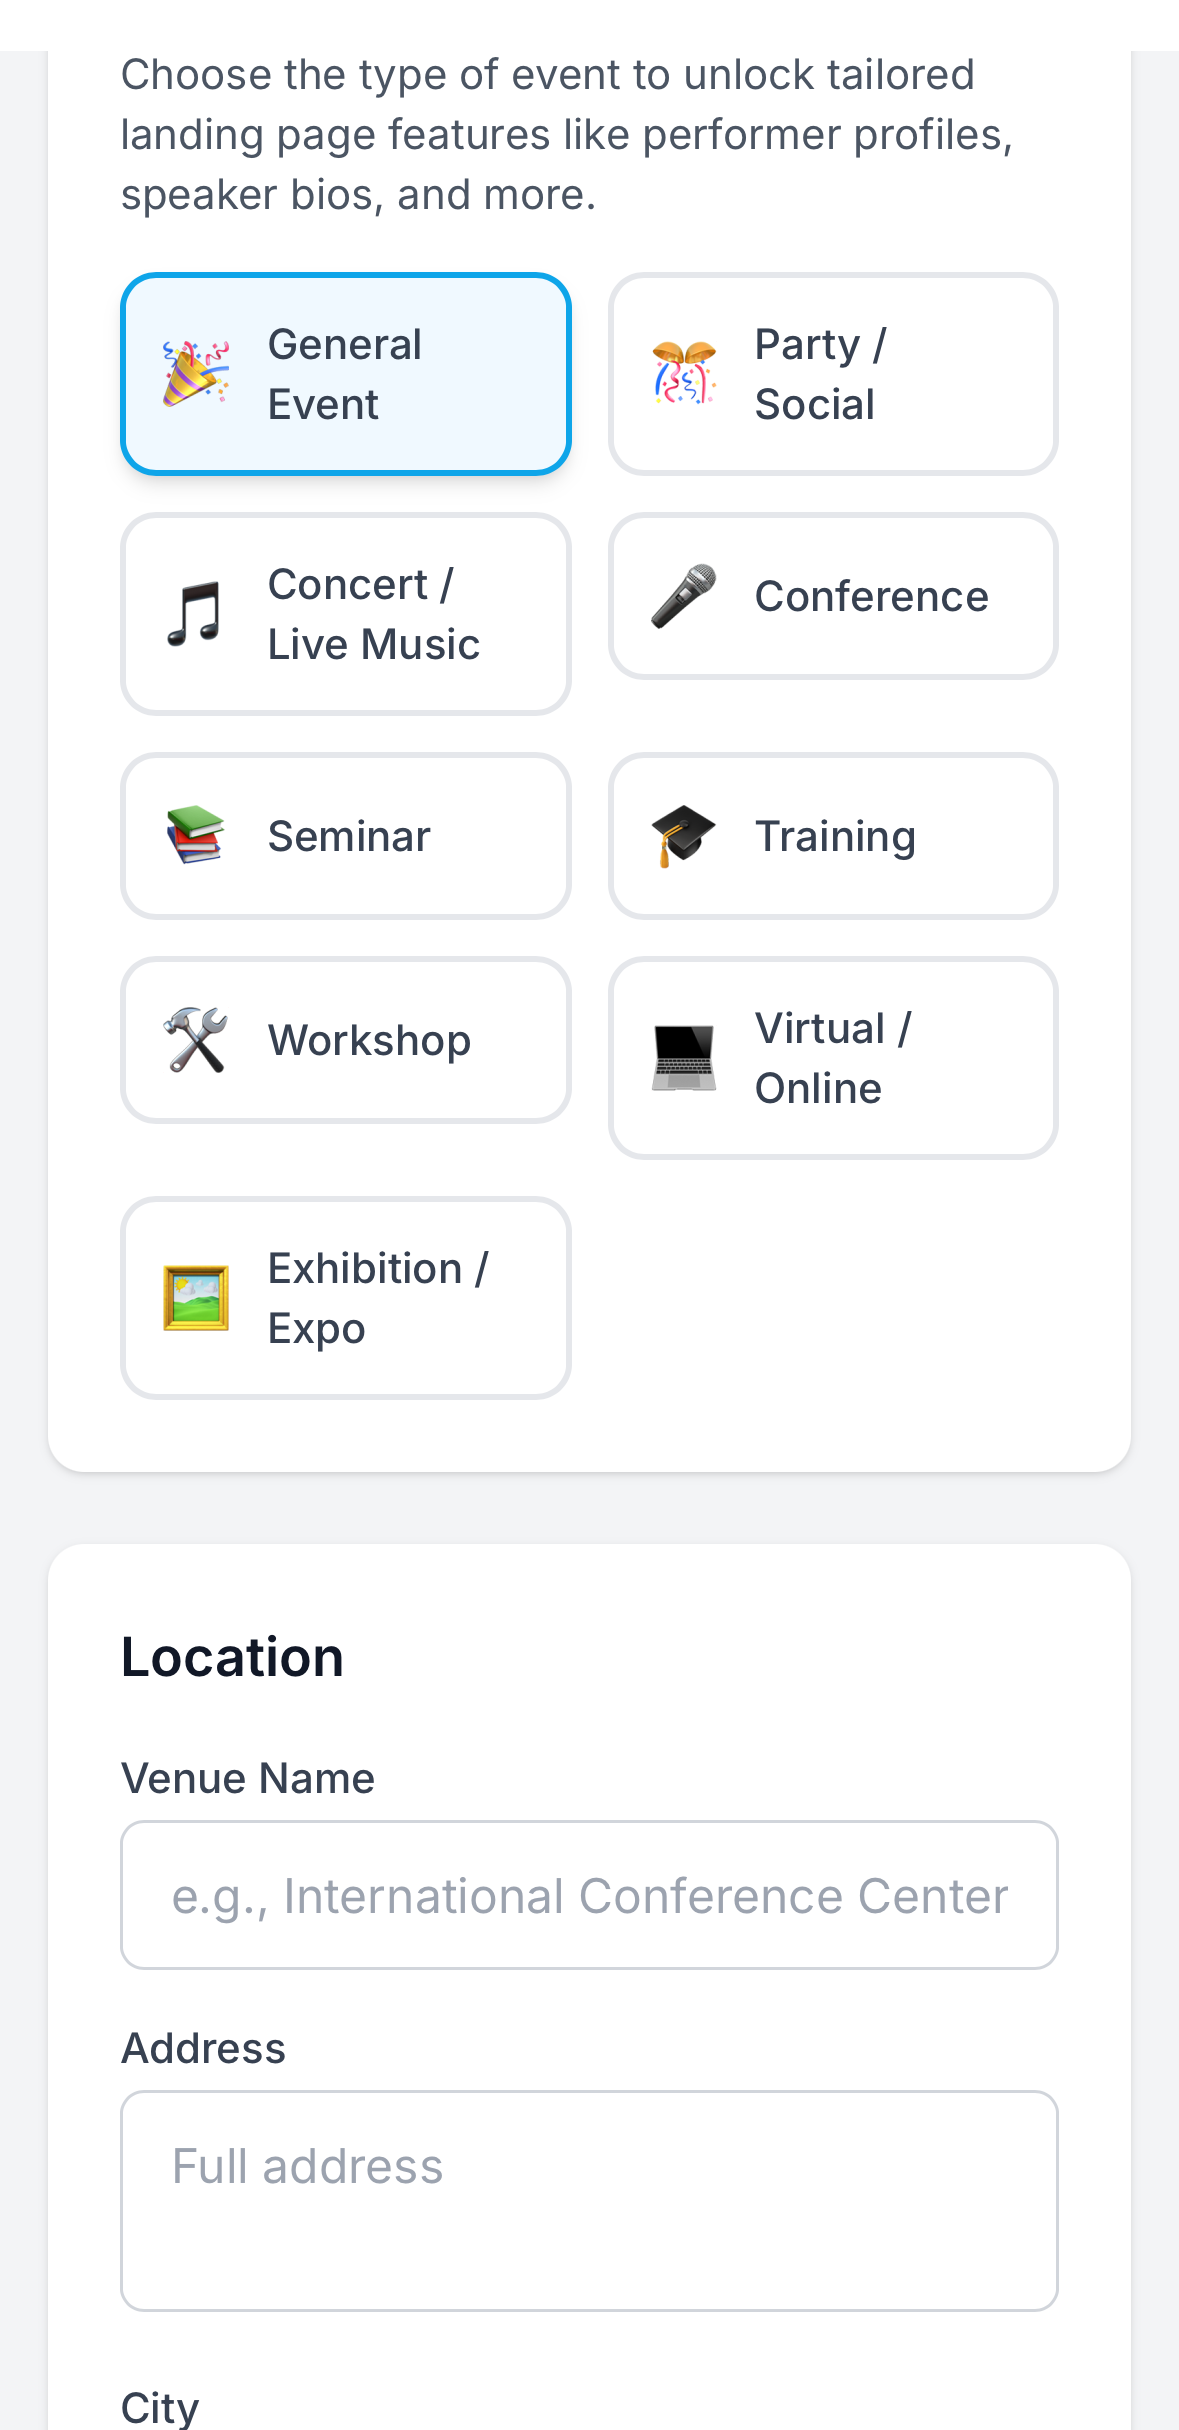
Next, select your event type. TikkBay supports nine event categories: Party/Social, Concert/Live Music, Conference, Seminar, Training, Workshop, Virtual/Online, Exhibition/Expo, and General Event. Picking the right type helps TikkBay suggest the right options for your event - for example, a concert will offer personality types like "Performing Artist" and "DJ," while a conference will offer "Speaker" and "Panelist."
Set your start date and optionally an end date. TikkBay works with time zones, so your event times will display correctly for your attendees regardless of where they are.
Running a recurring event? TikkBay supports multi-date events with up to 50 dates. If you are hosting a weekly show or a multi-day conference, tick the "Recurring Event" option and add each date with an optional label like "Week 1," "Saturday Show," or "Day 2 - Workshops." Each date gets its own ticket pool and check-in tracking.
Enter your venue name, address, city, state, and country. These details appear on your event page so attendees know exactly where to go.
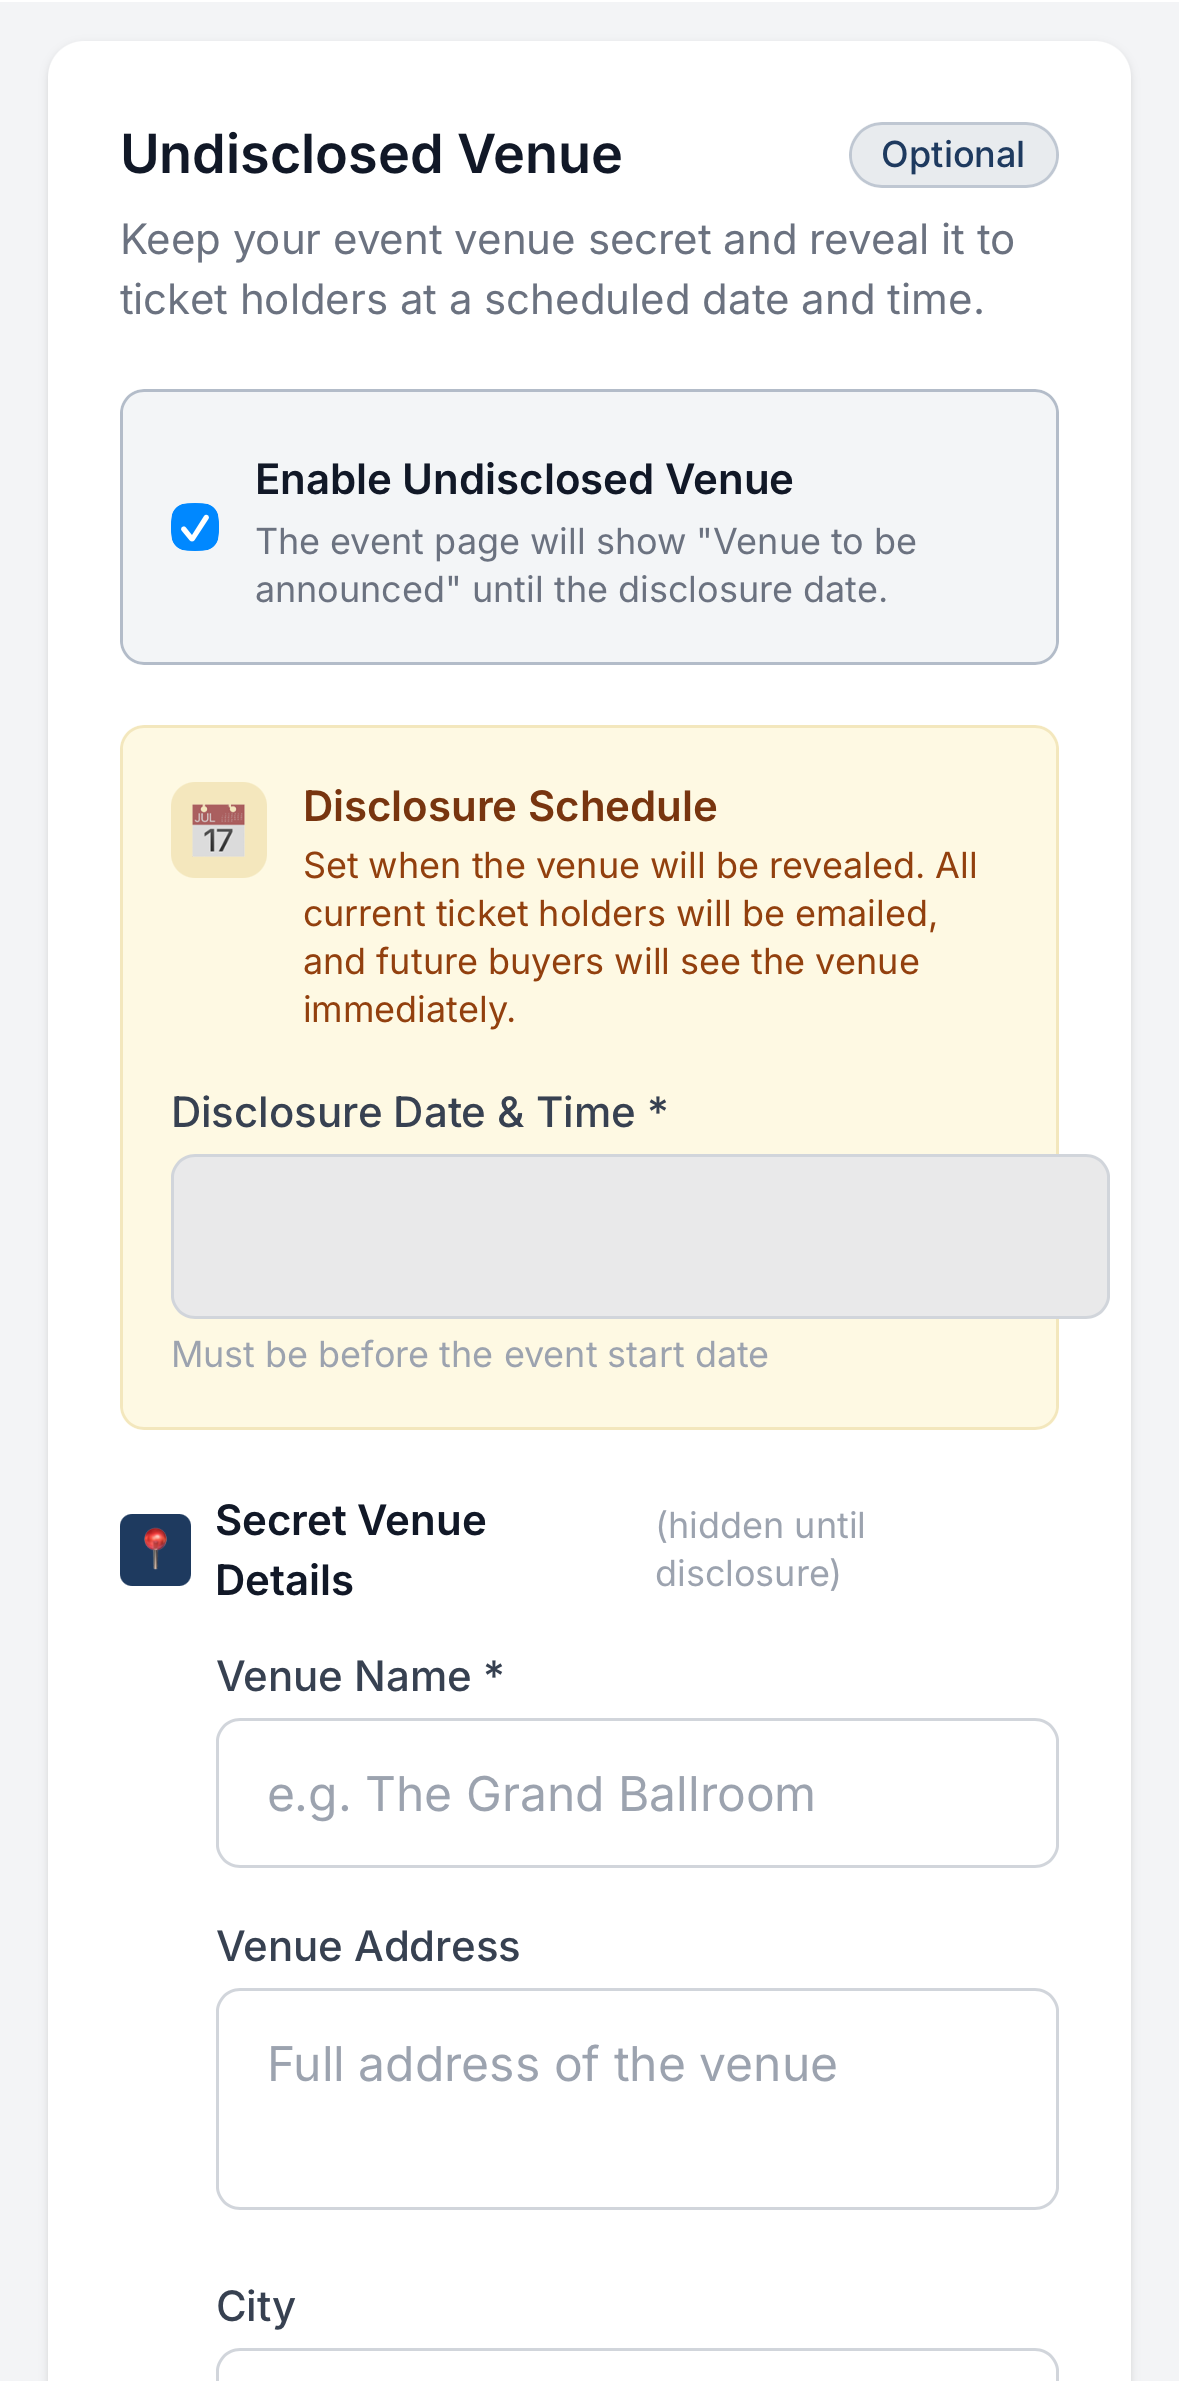
Planning a surprise venue? TikkBay has a clever feature called Undisclosed Venue. Toggle it on and enter the real venue details privately. You can set a disclosure date - the date when TikkBay automatically reveals the venue to ticket holders. Until that date, attendees just see that the venue will be disclosed closer to the event. This is perfect for exclusive parties and pop-up events.
 Cover Image
Upload a cover image that represents your event. TikkBay accepts JPEG, JPG, PNG, and WebP images up to 5MB. This image appears at the top of your event page and in event listings, so use something eye-catching and high quality. A good cover image can be the difference between someone clicking your event and scrolling past it.
Write a compelling description of your event. TikkBay provides a rich text editor, so you can format your text with bold, italics, headings, lists, and links. Tell potential attendees what to expect, who is performing or speaking, what they will gain, and why they should not miss it.
You can also add a short description (up to 500 characters) which appears in event previews and search results.
Before saving, there are several powerful settings worth knowing about.
This controls when attendees receive their tickets after purchase. You have three options:
By default, TikkBay adds a service fee on top of the ticket price at checkout. If you toggle on "Absorb Service Fee," that fee comes out of your revenue instead, and your attendees see a clean, round price. So if you price a ticket at N5,000, the attendee pays exactly N5,000 - the platform fee is deducted from your payout.
This is a smart move for premium events where you want the pricing to look clean and professional.
Toggle this on if you do not want your event to appear in TikkBay's public listings or search results. A private event is only accessible via its direct link. You share the link with the people you want to attend. Perfect for corporate events, private parties, and invite-only gatherings.
You can set a sales start date and sales end date for the entire event. This means ticket sales will not open until your specified date, and they close automatically when the window ends. You will also be able to set individual sales windows per ticket type later.
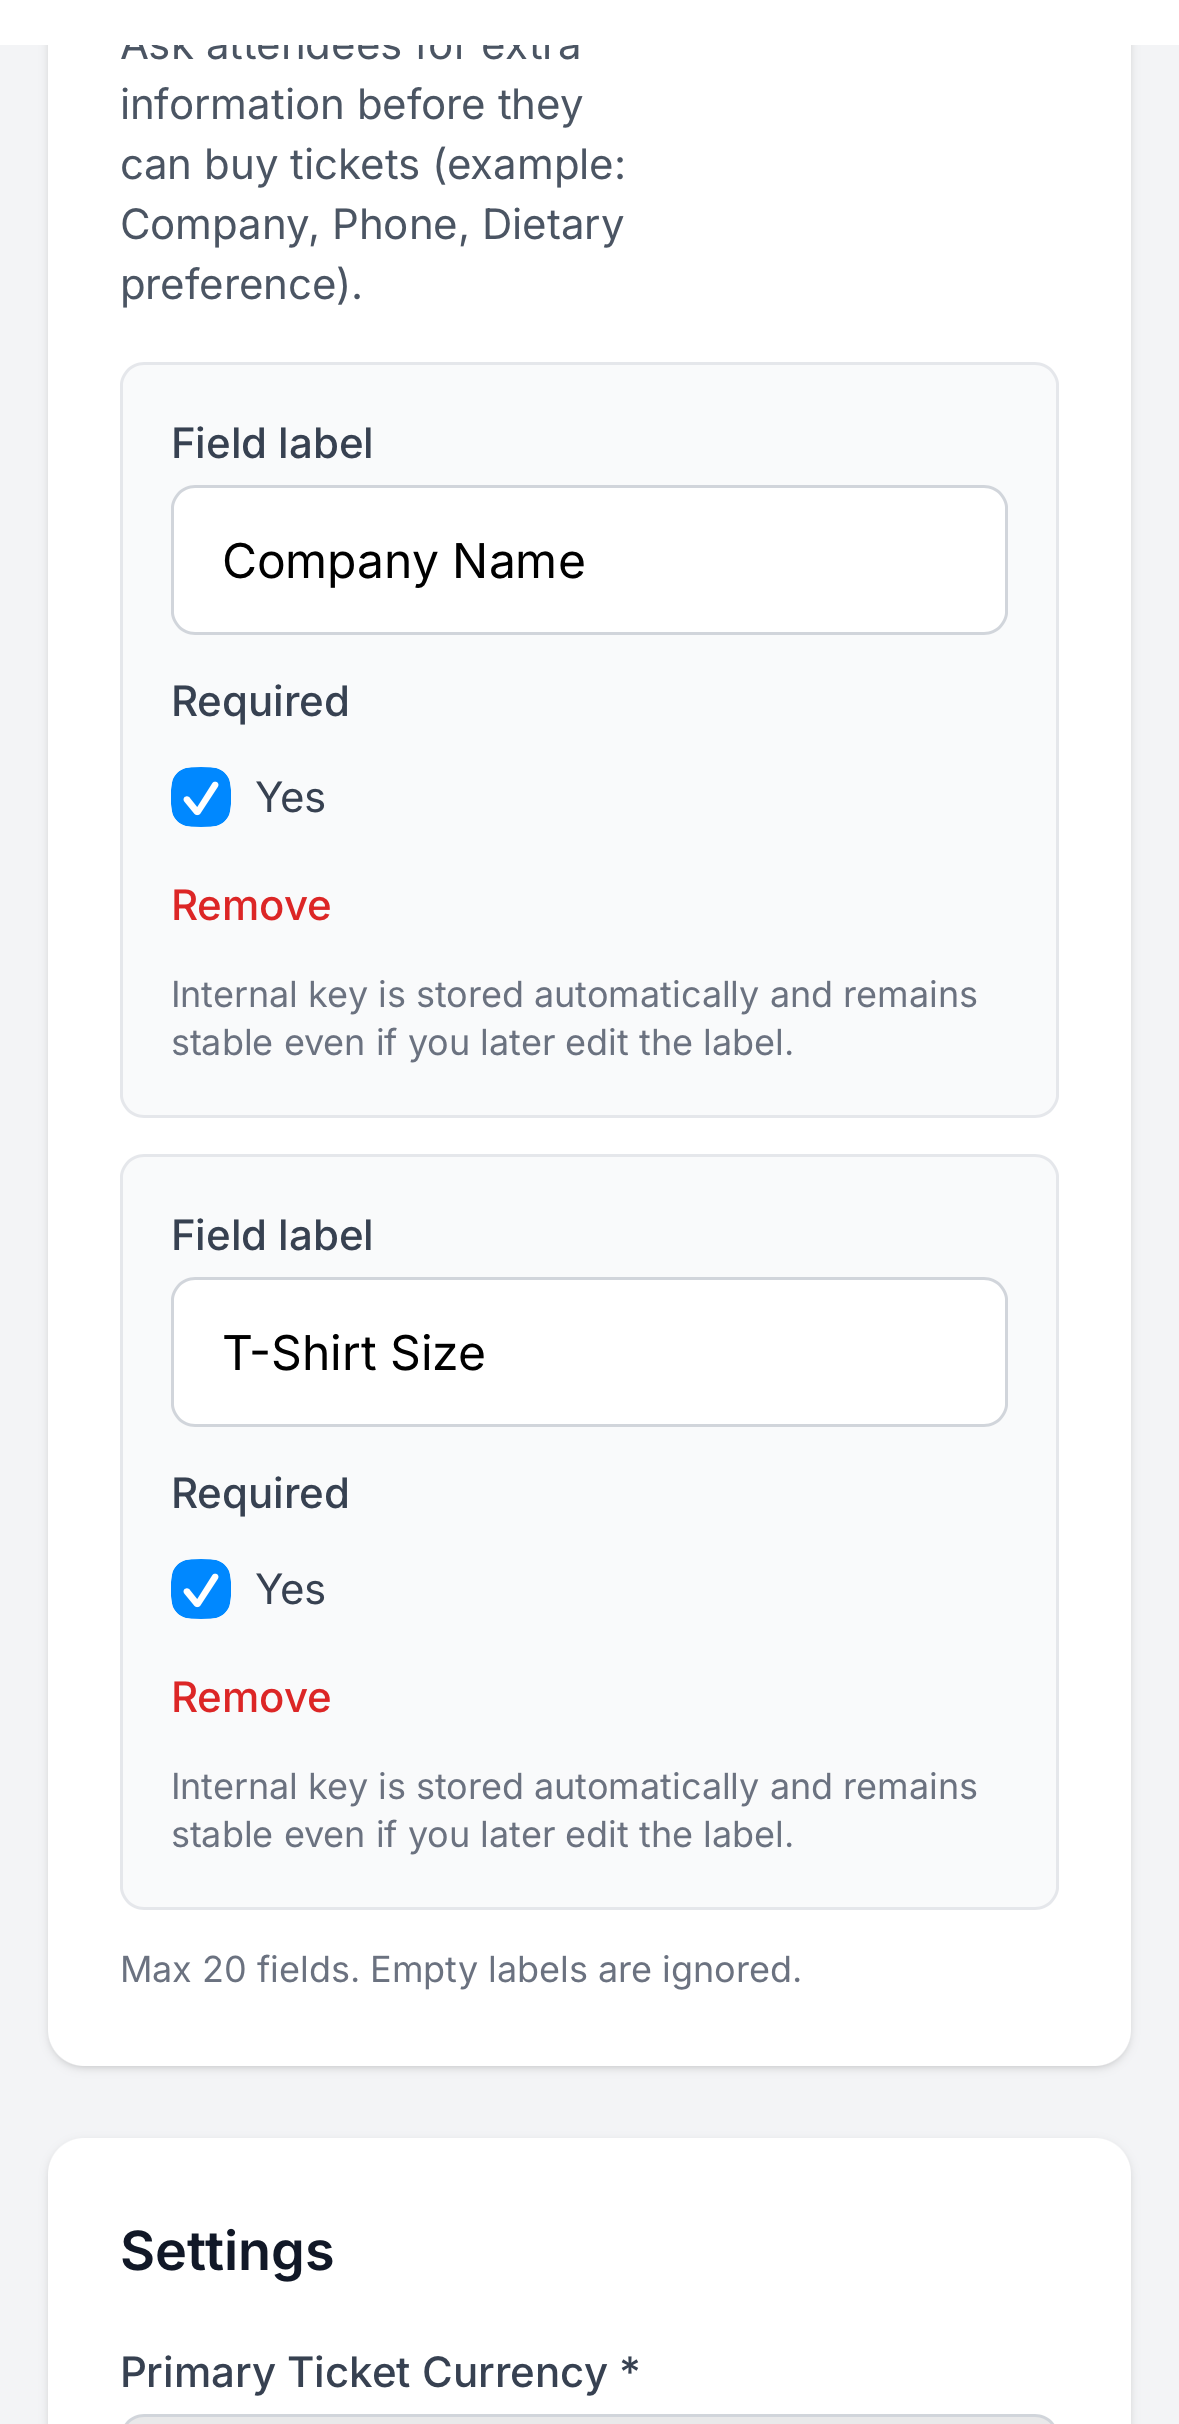
Need to collect extra information from buyers? TikkBay lets you add up to 20 custom checkout fields. Each field has a label and can be marked as required or optional.
Common examples include "T-shirt size," "Company name," "Dietary preference," "How did you hear about us?" and "Instagram handle." This data appears in your order records, so you can plan catering, merchandise, or marketing follow-ups.
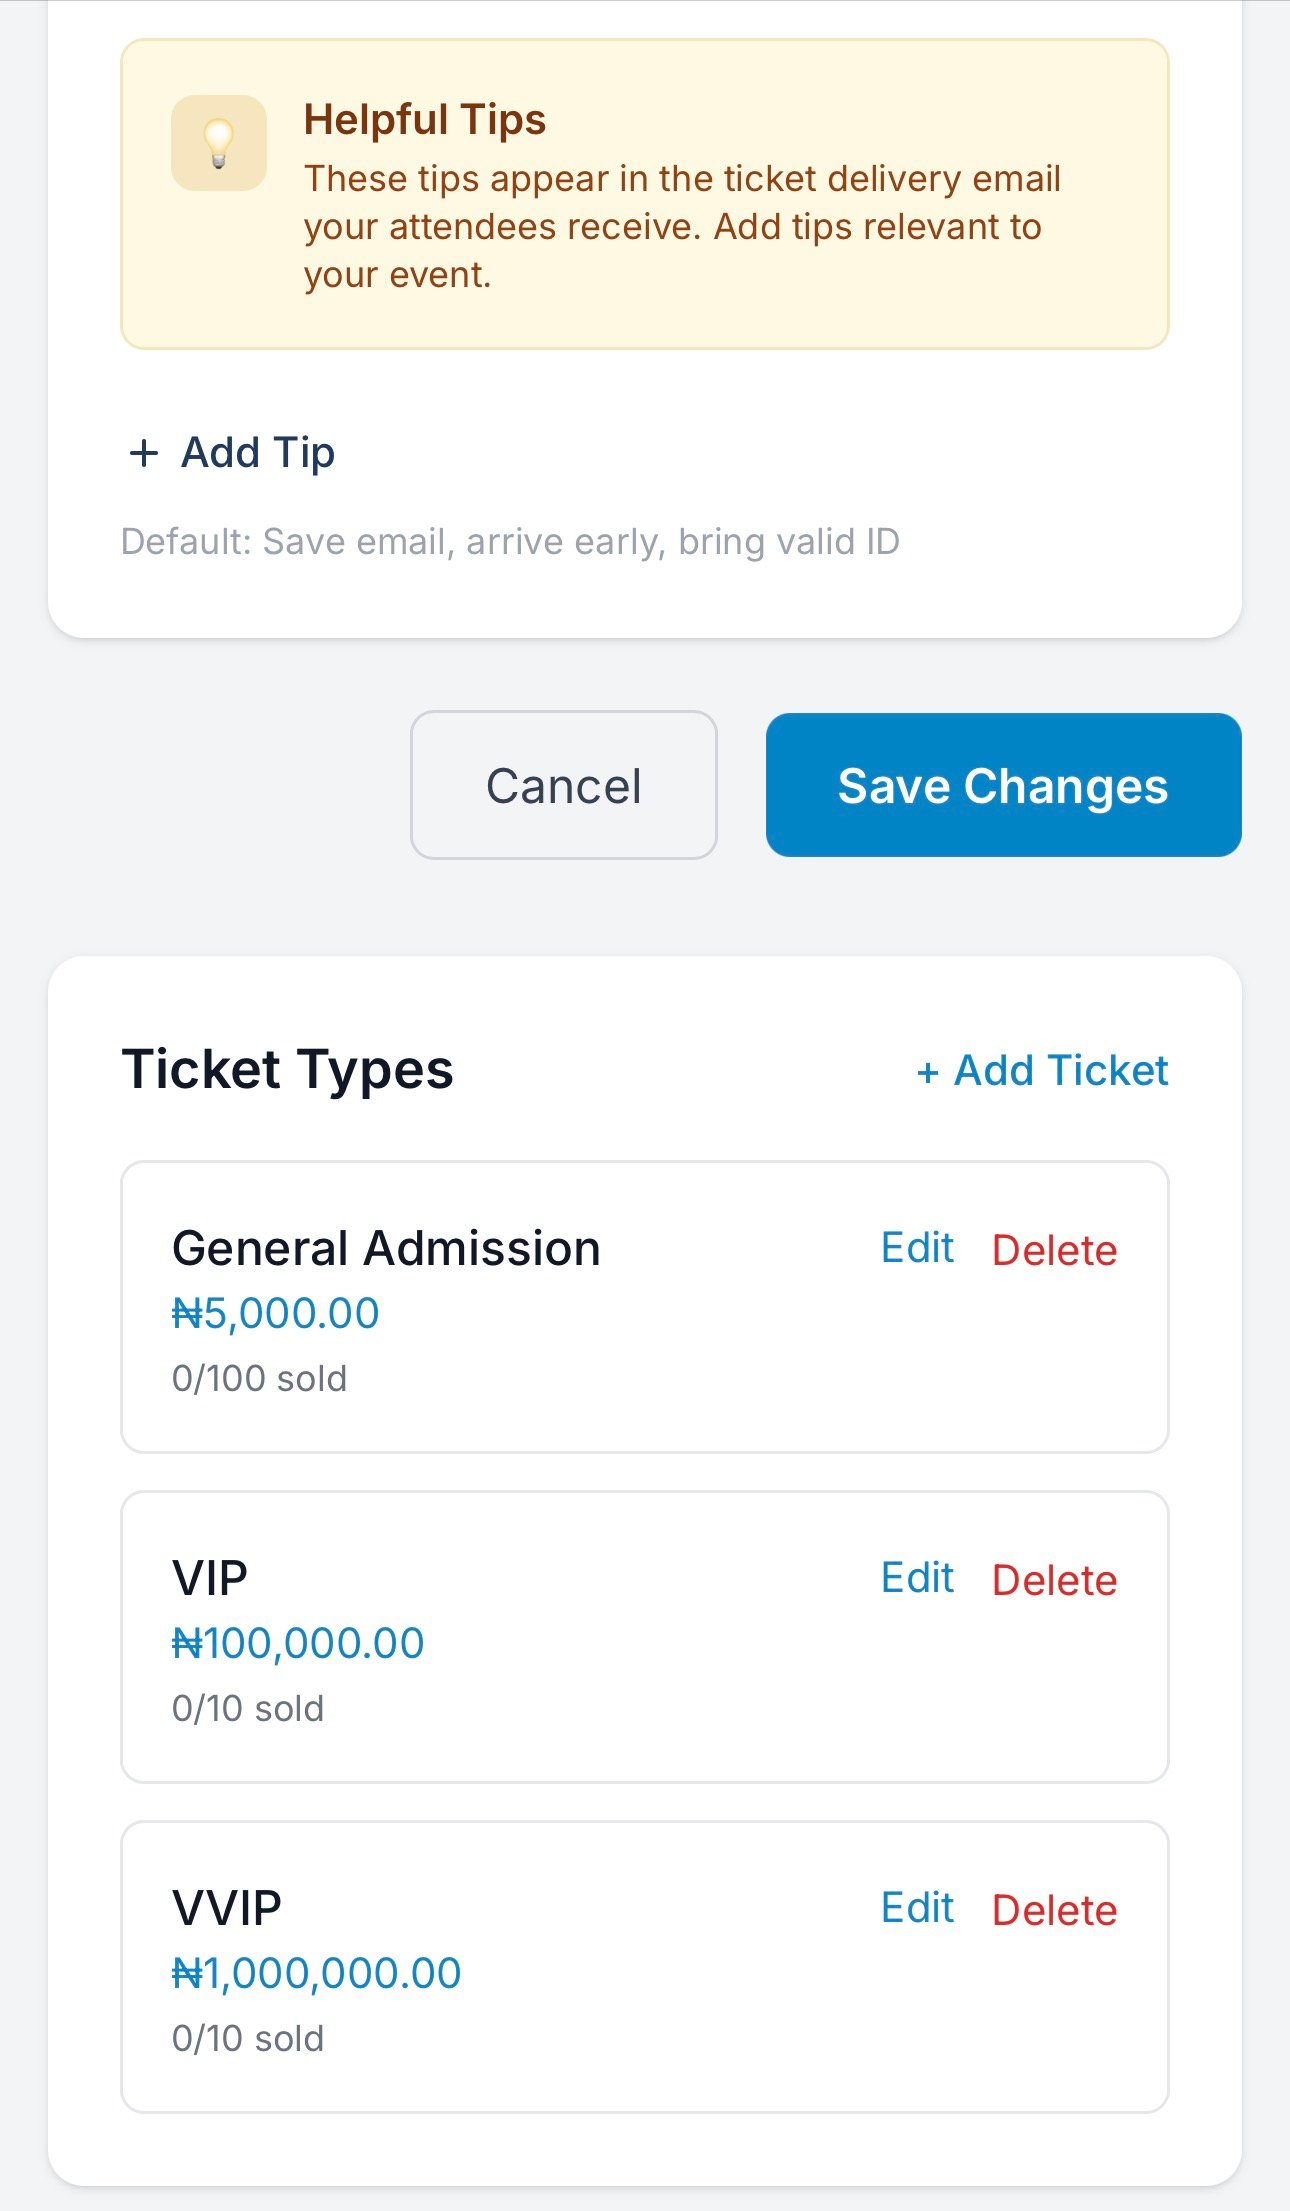
TikkBay sends automated emails to your attendees at three key moments: when their ticket is delivered, 48 hours before the event, and on the day of the event. You can add custom tips to each of these emails - things like "Wear comfortable shoes," "Parking is available at Gate B," or "Bring a valid ID for entry." You can add up to 10 tips per email.
This is a thoughtful touch that makes your event feel well-organised before it even starts.
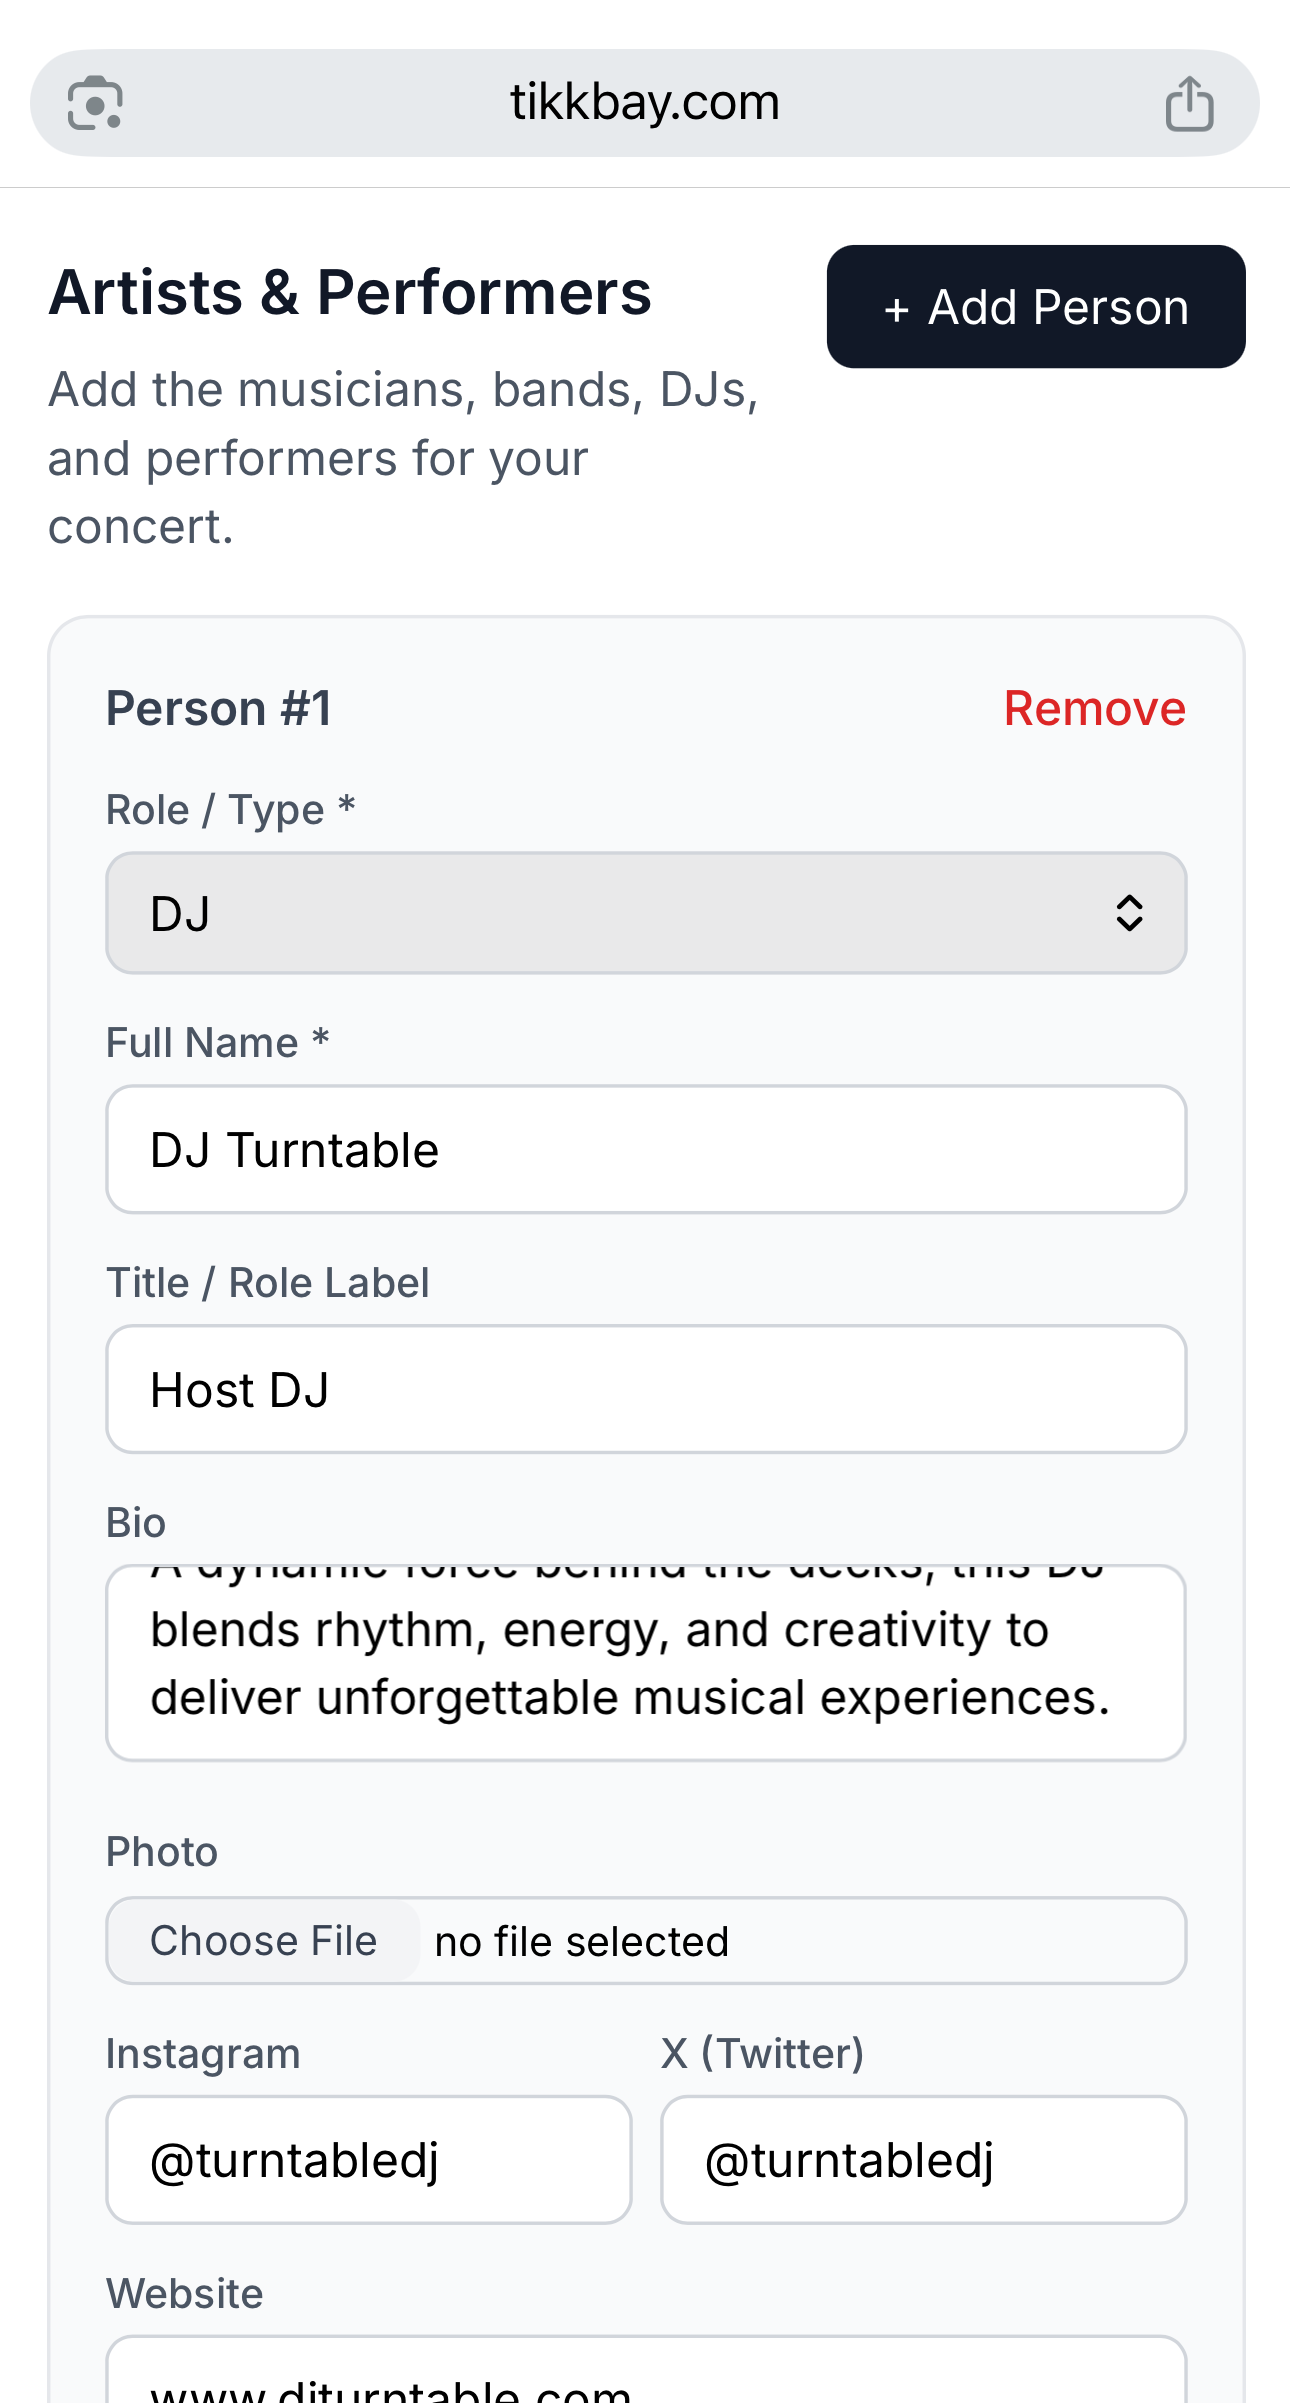
If your event features speakers, DJs, performers, hosts, or panelists, you can showcase them right on the event page. TikkBay lets you add up to 20 personalities per event.
For each person, you can provide their name, title, a short bio (up to 2,000 characters), a photo, and social media links (website, Twitter/X, Instagram, LinkedIn). The personality types available depend on your event type - concerts show "Performing Artist," "DJ," and "MC" options, while conferences show "Speaker," "Panelist," and "Host."
Adding personalities makes your event page look professional and helps sell tickets because people buy tickets to see specific people.
Click Save and your event is created with a "Draft" status. This means it exists in your dashboard but is not visible to the public yet. Before you can publish it, you need to add at least one ticket type.
After saving, TikkBay redirects you to the event edit page where you can add tickets.
This is where you define what you are selling. On the event edit page, scroll down to the Ticket Types section and click to add a new ticket type.
Each ticket type has these fields:
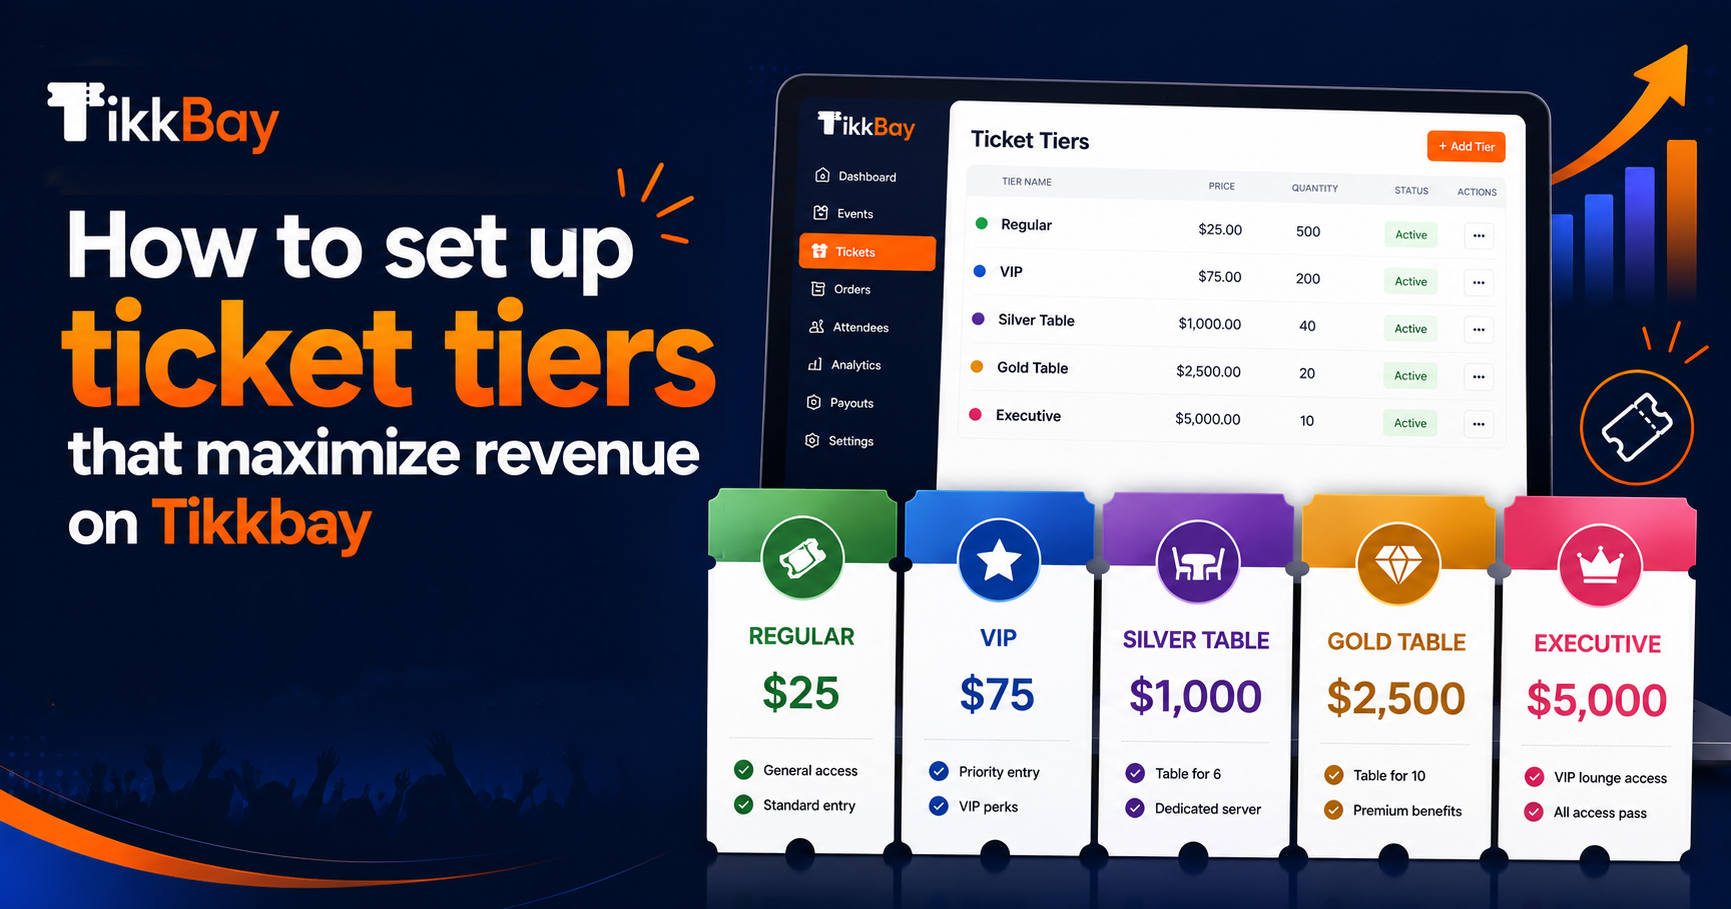
Name - What attendees see. Common examples: "Early Bird," "Regular," "VIP," "VVIP," "Table for 10," "Student," "Group of 5."
Price - The ticket price in your event's currency. For Nigerian events, this is in Naira. Set it to 0 for a free ticket. Important: once you save a ticket type, the price cannot be changed. This protects attendees who have already purchased.
Quantity Available - The total number of tickets available for this tier. Leave it blank for unlimited. If you set it to 200, sales stop automatically when 200 tickets are sold.
Admits Count - How many people one ticket admits. A regular ticket admits 1. A "Table for 10" admits 10. This is especially useful for table packages at concerts and parties. You can set this anywhere from 1 to 100.
Min/Max Per Order - Control how many of this ticket type someone can buy in a single order. Set a minimum of 2 for a "Couples" ticket, or a maximum of 5 to prevent bulk buying.
Sales Start/End Date - Give each ticket tier its own sales window. This is how you create Early Bird pricing that expires automatically. Set the Early Bird sales end date to two weeks before the event, and buyers who come after that only see the Regular price.
Visibility - You can make a ticket type hidden. Hidden tickets do not appear on the event page unless accessed via a special link. This is useful for sponsor tickets, complimentary passes, or secret discount tiers.
Here is a practical example for an "Afrobeats Night Lagos" event:
Ticket Type Price Quantity Admits Sales Window Early Bird N3,000 100 1 Now - 2 weeks before event Regular N5,000 300 1 After Early Bird closes VIP N15,000 50 1 Now - event day VVIP Table N100,000 10 10 Now - event day The VVIP Table is priced at N100,000 and admits 10 people. So a group books one table and gets 10 entries. Each person gets their own QR code ticket for entry.
Yes, TikkBay fully supports free events. Just set the ticket price to N0. Attendees still go through checkout (so you capture their details), they still get a QR code ticket, and you can still scan them in at the door. This is great for community events, church programmes, and brand activations where you need to manage attendance even though there is no charge.
Before going live, you want to see exactly what your attendees will see. Click the Preview button on the event edit page. TikkBay generates a temporary preview link (valid for 1 hour) that shows your event page exactly as it would appear to the public - including the cover image, description, ticket types, and personalities.
Check everything: Is the title right? Do the ticket prices look correct? Is the description compelling? Does the cover image display well? Fix anything that needs adjusting.
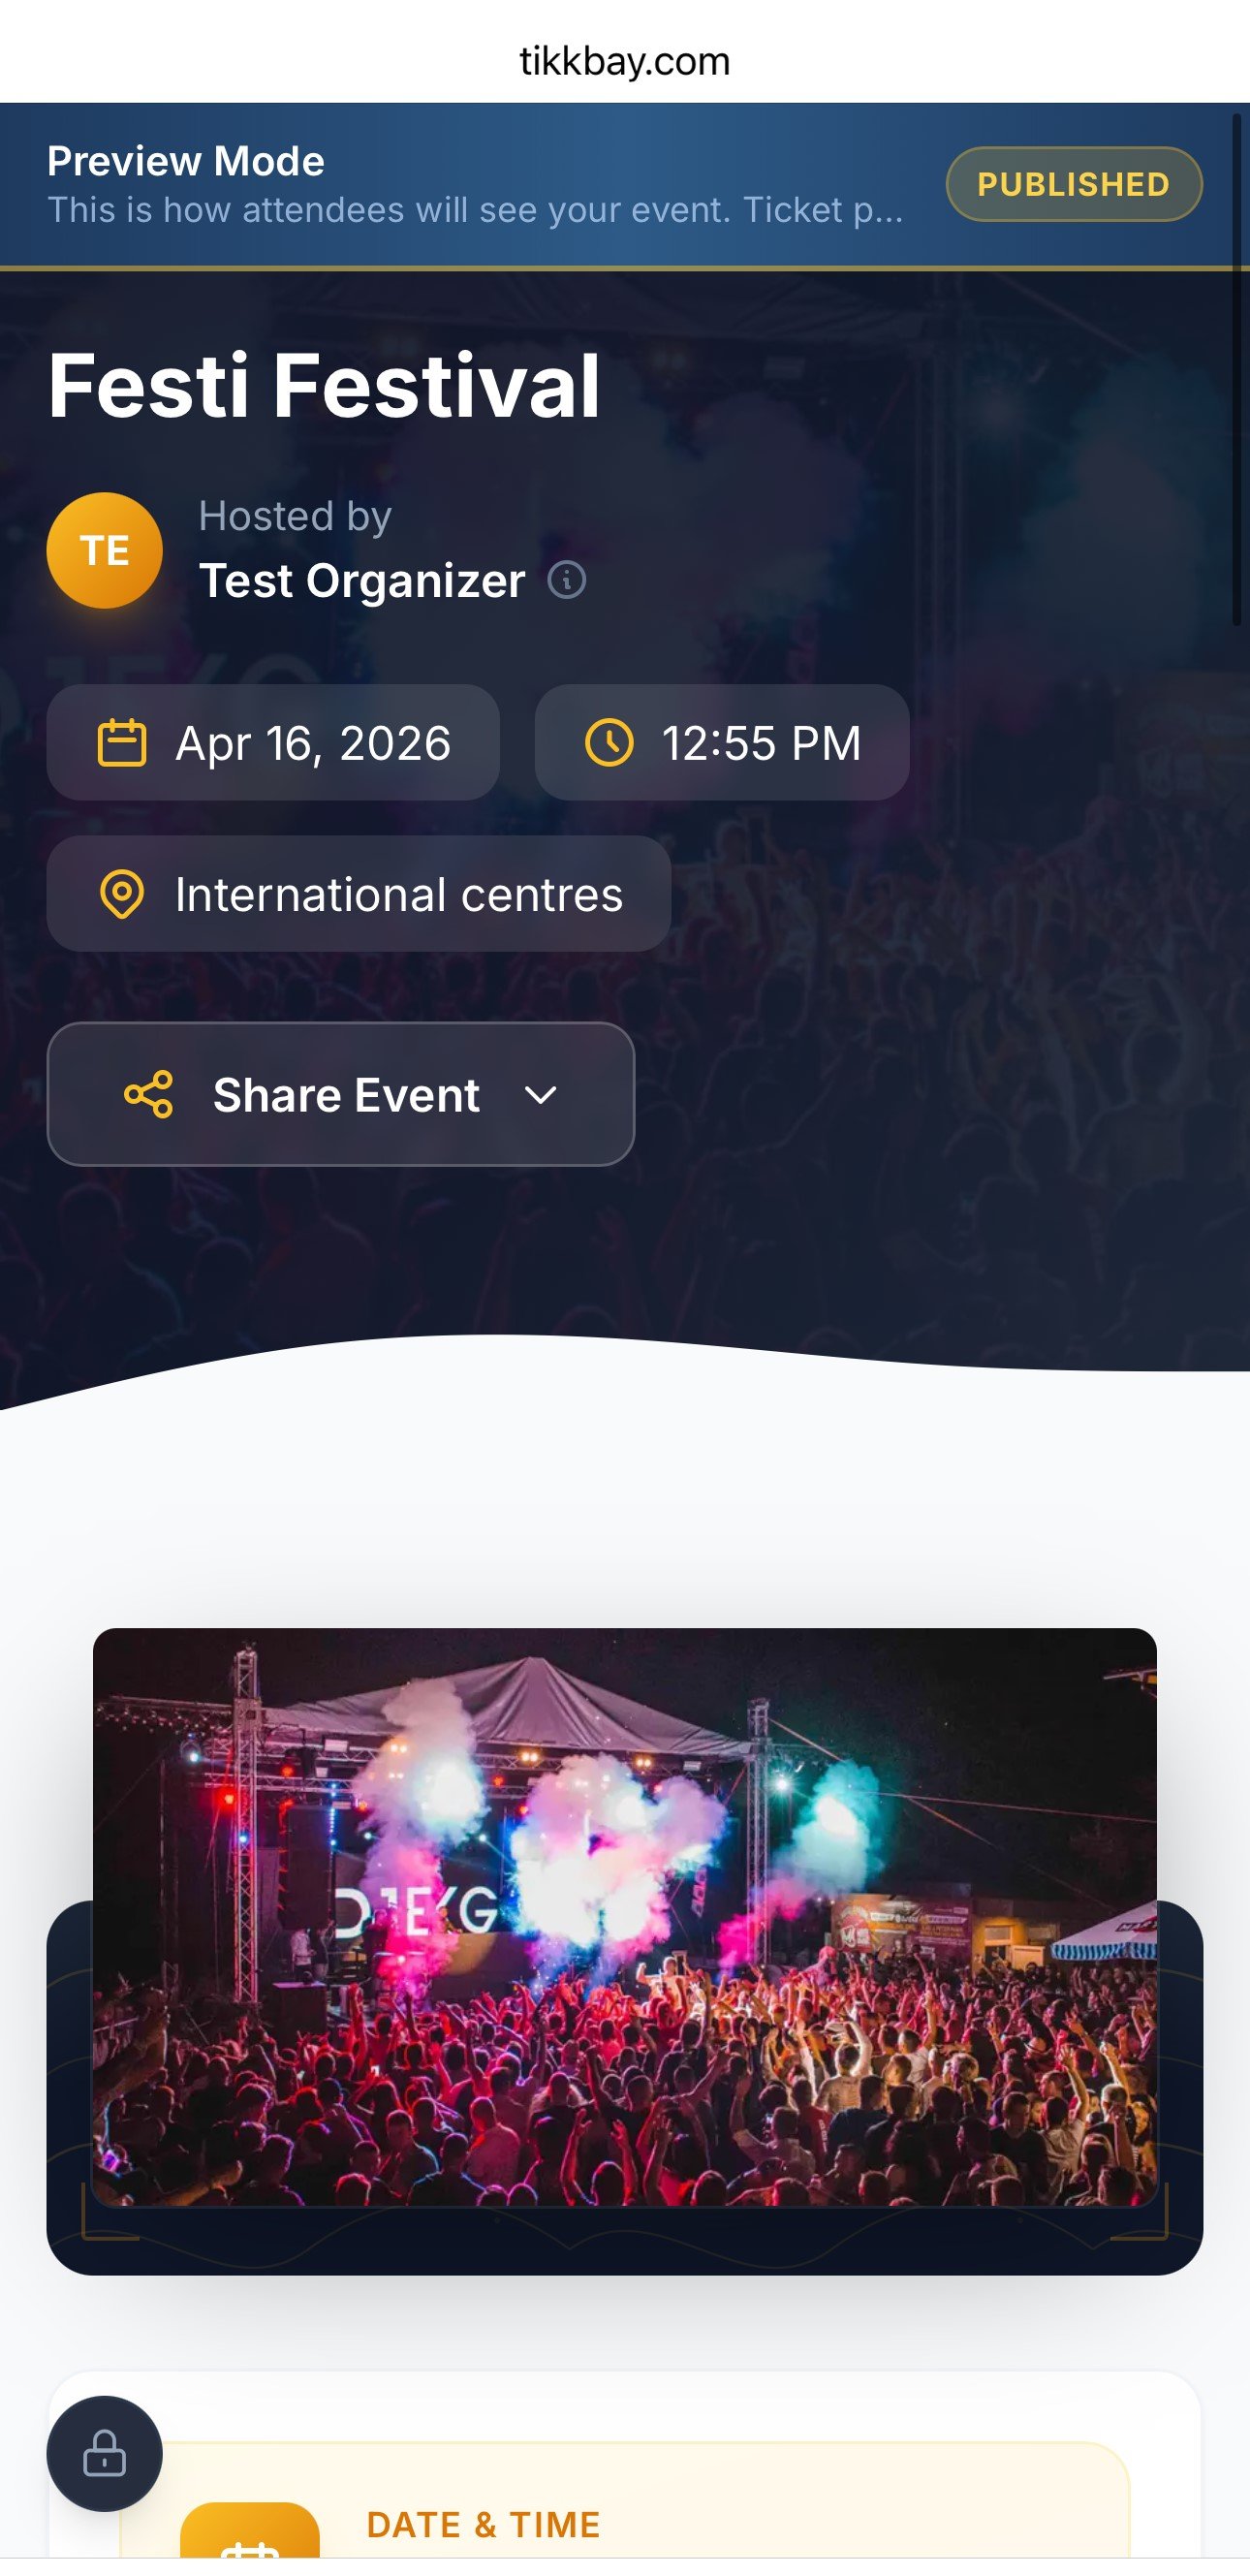
Once you are happy with everything, go back to the event edit page and click Publish. Your event status changes from "Draft" to "Published," and it goes live on TikkBay.
Two requirements must be met before you can publish:
Once published, your event gets a public URL that you can share everywhere - WhatsApp, Instagram, Twitter, email, wherever your audience is. Attendees can visit the page, select their tickets, and pay instantly.
Changed your mind? You can unpublish an event at any time to take it off the public listing. You can also cancel an event if plans change entirely.
When an attendee purchases a ticket, here is what happens behind the scenes:
Payment processing - TikkBay processes the payment securely. In Nigeria, payments go through Paystack and support card, bank transfer, and USSD. In the other 13 supported African countries, payments go through Flutterwave and support card, bank transfer, mobile money, and more.
Ticket delivery - Based on your delivery mode setting, the attendee receives an email with their ticket. Each ticket has a unique QR code generated with a SHA-256 hashed token. If you set delivery to "immediate," they get it right away.
Your dashboard updates - Back in your organiser dashboard, you will see the order appear in your recent orders feed. Your revenue counter goes up. Your tickets sold counter goes up. It is a beautiful thing.
Automated reminders - TikkBay automatically sends reminder emails to attendees 48 hours before the event and again on the day of the event - complete with any custom tips you added.
Creating and publishing your event is just the beginning. Once your event is live, TikkBay gives you a full suite of tools:
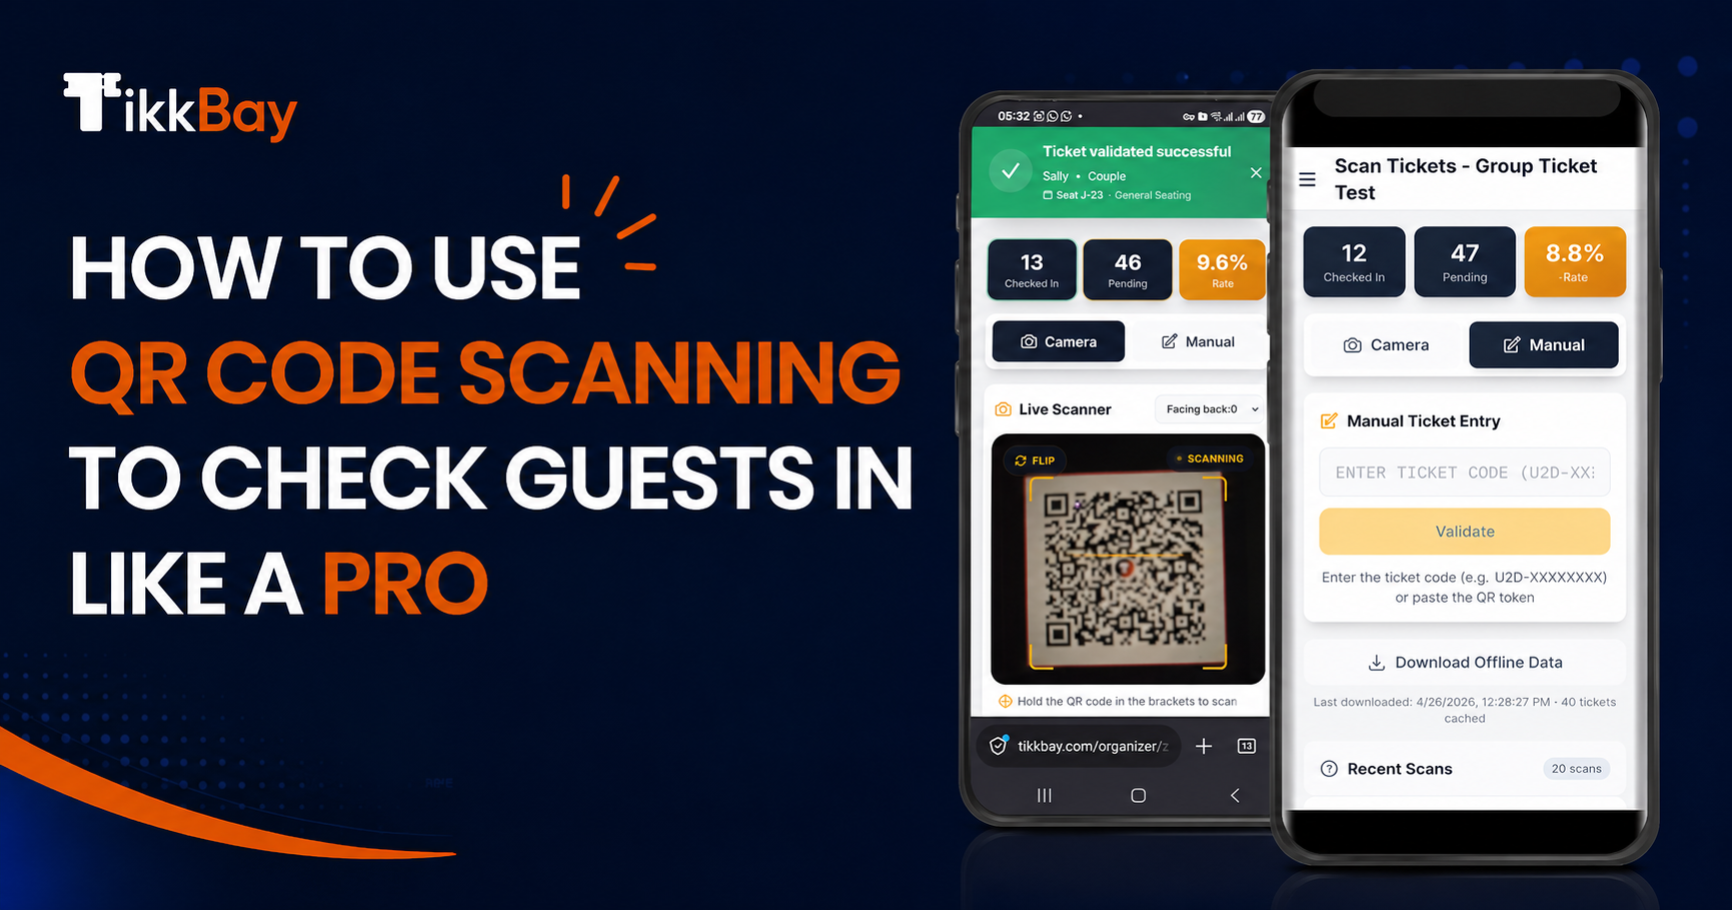
QR Code Scanning - On event day, scan tickets at the door using your phone's camera. The scanner shows a green check for valid tickets, a yellow warning for already-scanned tickets, and a red X for invalid ones. It even works offline - download your ticket pack beforehand and scan without internet.
Discount Codes - Create percentage or fixed-amount discount codes to boost sales. Set maximum uses, minimum order amounts, and valid date ranges.
Seat Reservation - For events with assigned seating, TikkBay has a visual venue layout builder with pre-built templates. Attendees pick their exact seat on an interactive map at checkout.
Campaigns - Send email and WhatsApp campaigns to past attendees to promote your next event.
Budget Management - Track your event budget with categories for venue, entertainment, catering, equipment, and more. Compare planned versus actual spend.
Team Management - Invite team members with specific permissions. Your door staff can scan tickets without accessing your revenue data.
Payouts - Set up your bank account and choose your payout frequency: weekly, every two weeks, or monthly. TikkBay pays you directly.
We will cover each of these features in depth in future articles.
Your next event deserves a platform that makes ticketing easy, payments seamless, and check-in stress-free. TikkBay handles all of that so you can focus on what matters - creating an unforgettable experience for your attendees.
Head over to tikkbay.com, create your account, and build your first event page today. It takes less than 10 minutes, and your first event could be selling tickets before you finish your next cup of coffee.
If you need help setting up, TikkBay also offers an Assisted Setup service where the team builds your event page for you. Just reach out through the platform.
See you on the other side.


A global event discovery and ticketing platform. Find something worth dressing up for.
We use cookies to enhance your experience, analyse traffic, and for marketing. You can choose which categories to allow. Read our Privacy Policy.
TikkBay Support
Usually responds instantly
Create a Support Ticket
Powered by Plusky IT Solutions
Need help? We're here!
Ask about tickets, events, payouts, and more. Click to chat.