How to Use QR Code Scanning to Check Guests In Like a Pro
Jul 7, 2026 · 10 min read
If you have ever attended an event where the seating arrangement was pure chaos - people arguing over chairs, VIPs squeezed into the back row, couples separated by three strangers - you know how much reserved seating matters. Now imagine giving your attendees the power to choose their exact seat when they buy their ticket. That is what TikkBay's Seat Reservation System does.
This is not a basic "Row A, Row B" setup. TikkBay gives you a visual venue layout builder, customizable pre-built templates for common venue types, three flexible pricing modes, and an interactive seat map that attendees use at checkout to click on the exact seat they want. And it all syncs in real time so two people never book the same seat.
Let us walk through everything - from building your venue layout to what your attendees see when they are picking seats.
General admission works fine for some events. But for many - concerts with premium sections, conferences with front-row speaker access, theatre productions, church services, comedy shows, gala dinners - giving people a specific seat makes the experience better and lets you charge accordingly.
With TikkBay's reserved seating, you can charge more for front-row seats. A free community event can offer general admission at no cost while charging N5,000 for premium front-row seats. A concert can have a N3,000 regular ticket with a N10,000 surcharge for VIP pit seats. A conference can reserve the first two rows for speakers and sponsors while selling the rest to attendees. The flexibility is built into the system.
Reserved seating also eliminates the "first come, first served" scramble at the door. Every attendee walks in knowing exactly where they are sitting. Your ushers simply point them in the right direction.
Before you can enable reserved seating for an event, you need a venue layout. A venue layout is a digital map of your venue's seating arrangement. It lives in its own section of your organizer dashboard under "Venue Layouts" and can be reused across multiple events.
A layout is made up of sections, and each section contains rows and seats. For example, a theater might have an "Orchestra Front" section with 5 rows of 14 seats, a "Mezzanine" section with 4 rows of 18 seats, and a "Balcony" section with 3 rows of 20 seats. Each section can have its own color, price, and pricing mode.
Every layout starts in "Draft" status. Once you have added your sections and seats and are happy with the arrangement, you activate it. Only active layouts can be attached to events.
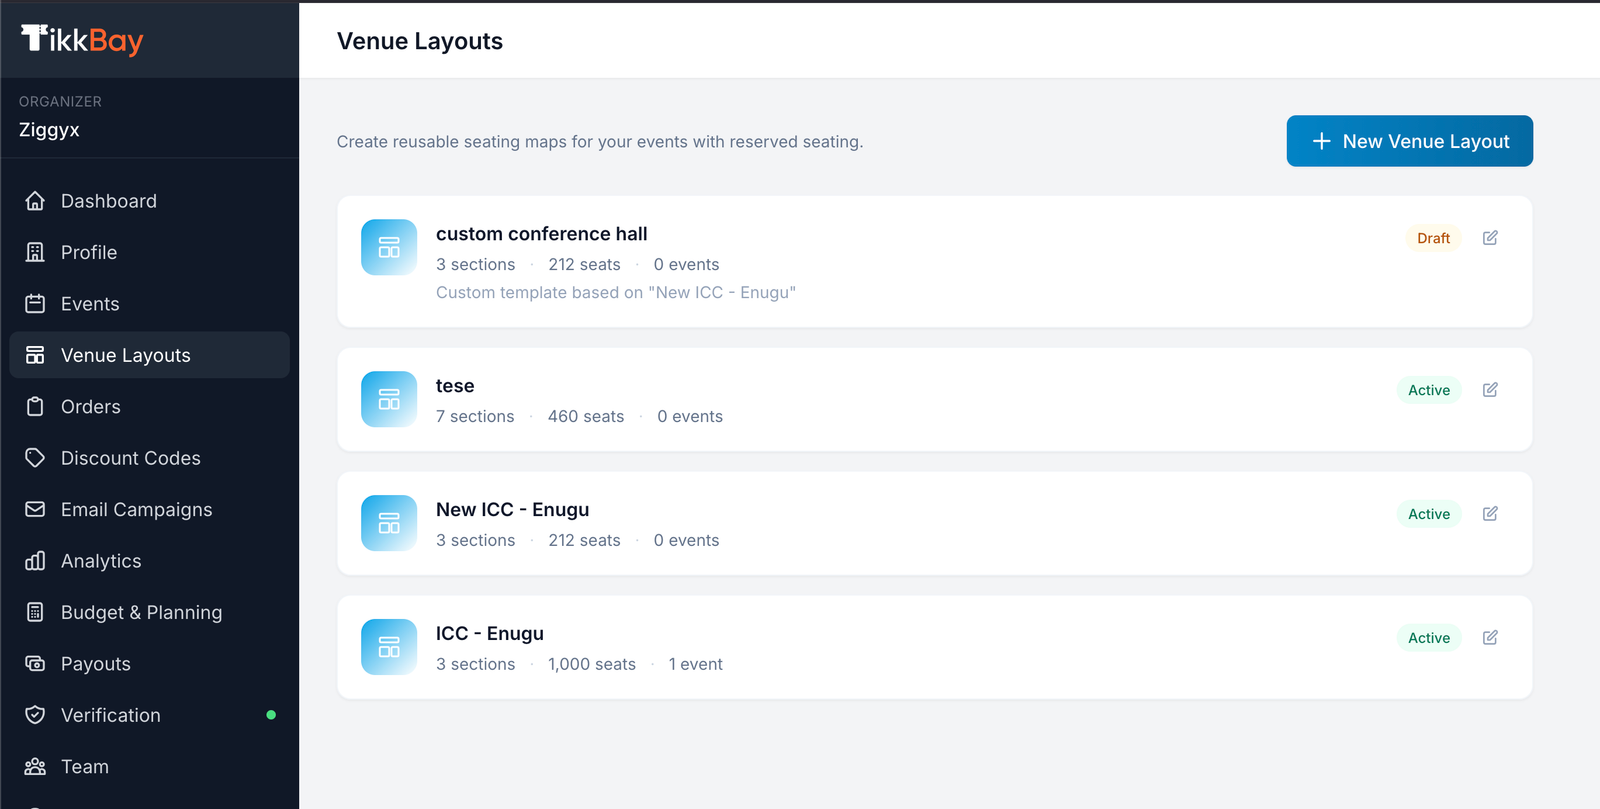
The Venue Layouts listing page showing one or two layouts with their section count, capacity, and status
You do not have to build a layout from scratch. TikkBay provides 7 customizable pre-built venue templates that cover the most common event setups. Each template comes with sections, rows, seats, aisle configurations, and suggested pricing tiers already configured. Just pick a template, give it a name, and customize from there.
Here are the templates available:
Theater (~350 seats): A classic proscenium theater layout with Orchestra Front, Orchestra Rear, Mezzanine, and Balcony sections. Ideal for plays, award ceremonies, and concerts.
Concert Hall (~450 seats): A fan-shaped concert venue with a VIP Pit, Floor Left, Floor Center, Floor Right, and Rear Elevated sections. Built for live music and large performances.
Arena / Stadium (~600 seats): A central-stage layout surrounded by tiered seating: Ringside VIP, Lower Bowl (Left, Center, Right), and Upper Bowl (Left, Center, Right). Great for boxing, concerts-in-the-round, and sports events.
Conference / Lecture (~200 seats): A classroom-style layout with Front Row Reserved, General Seating, and Rear Section. Perfect for seminars, lectures, and corporate events.
Nightclub / Lounge (~150 seats): VIP Tables near the stage, Lounge seating on both sides, a General Floor section, and Rear Standing. Perfect for club nights, parties, and intimate performances.
Banquet / Gala (~180 seats): A Head Table, Premium Tables near the front, Standard Tables on both sides, and Rear Seating. Suited for weddings, galas, fundraisers, and dinner events.
Intimate Venue (~80 seats): A simple layout with VIP Front rows and General Seating. Ideal for comedy shows, spoken word, acoustic performances, and private screenings.
When you create a layout from a template, TikkBay generates all the sections, rows, and seats automatically. The default seat prices are set based on tiers: VIP at N50,000, Premium at N30,000, Standard at N15,000, Mid at N10,000, and Economy at N5,000 for NGN events, but you can adjust every price after creation.
Templates also handle currency conversion automatically. If your organizer account is set to GHS, KES, or USD, the template prices scale accordingly.

The template selection screen showing the 7 pre-built templates with their names, descriptions, and approximate capacities
Here is the important part that makes templates truly powerful: they are just a starting point. After applying a template, you can fully customize the layout to match your specific venue.
Your venue has a section the template does not cover? Just add it. Click "Add Section" and configure the name, label, color, number of rows, seats per row, aisle positions, base price, and pricing mode. For example, if you used the Concert Hall template but your venue also has a side balcony, add a new section for it.
Every section that came from the template can be modified. Change the name, update the color, adjust the base price, switch the pricing mode, or link it to a different ticket type. The template gave you "Orchestra Front" but you want to call it "Platinum Zone"? Just rename it.
If the template includes a section your venue does not have, delete it. The Banquet template comes with "Rear Seating" but your venue does not have rear seats? Remove the section entirely.
Need to change the number of rows or seats per row in a section? You can regenerate the seats with new dimensions. If the Concert Hall template gave you 8 rows of 12 seats in Floor Center, but your venue has 10 rows of 15, just regenerate that section with the new numbers. You can also reconfigure the aisle positions during regeneration.
Note: You cannot regenerate seats in a section if any seats are currently held or sold. This protects attendees who have already purchased.
After setting up sections, you can fine-tune individual seats. Each seat can be set to one of three statuses: "available" (bookable by attendees), "blocked" (reserved by you and not shown as bookable), or "wheelchair" (accessible seating, available for booking but marked with an accessibility indicator). You can also set a price override on any individual seat to charge a different amount from the section's base price.
Once you have perfected your layout, you can save it as a reusable template. Click "Save as Template" and give it a name. Next time you run an event at the same venue, create a new layout from your saved template in seconds - no need to customize all over again.
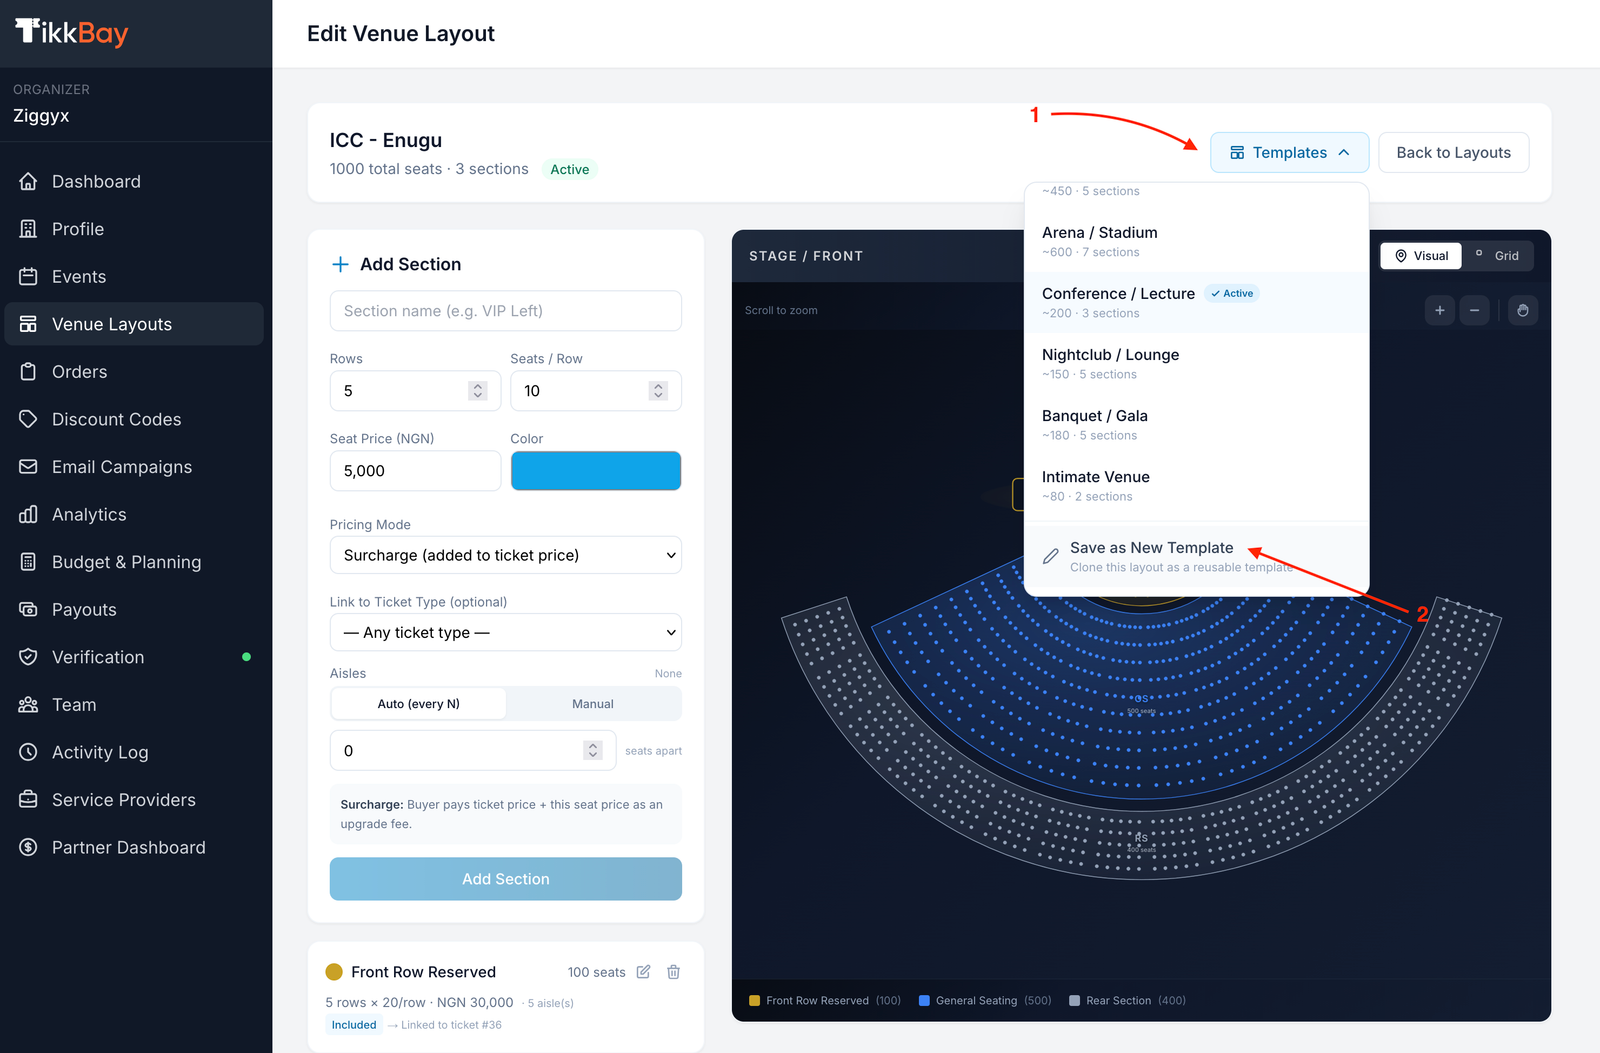
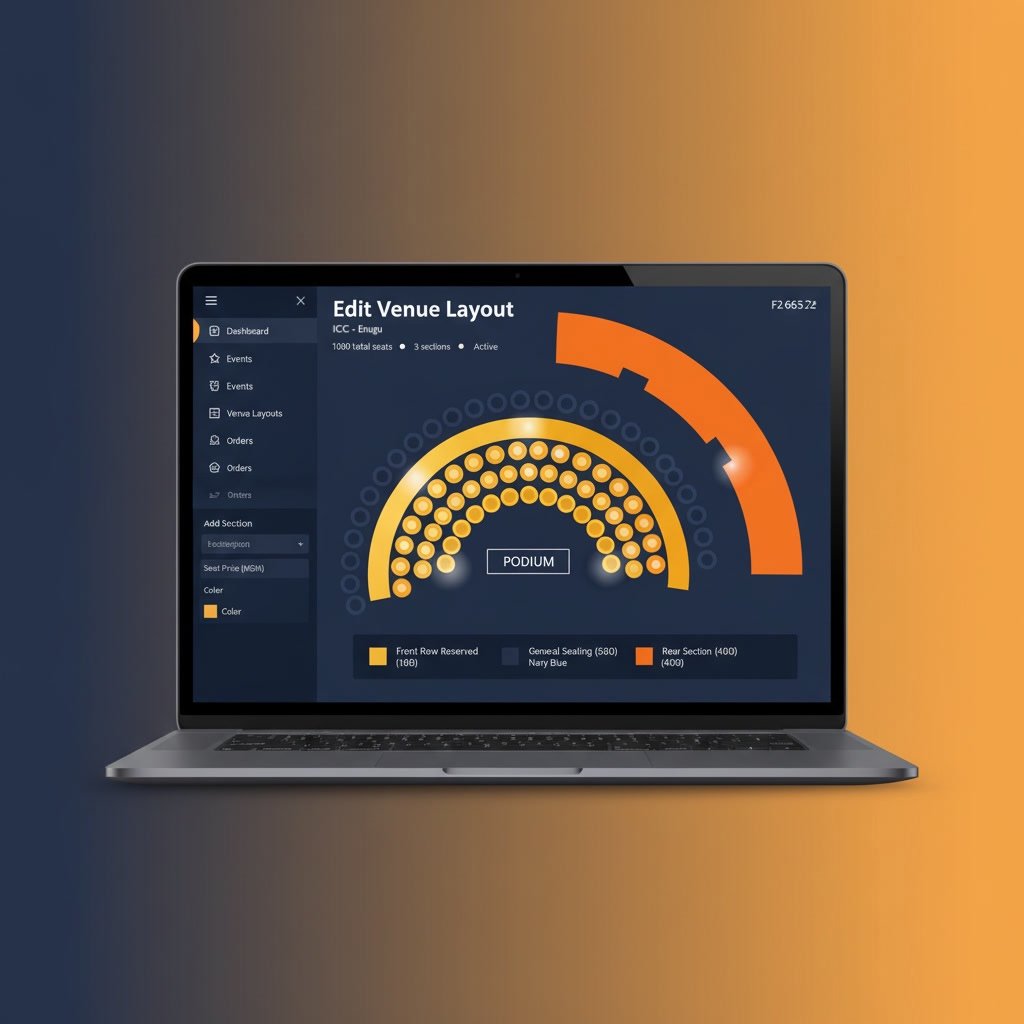
The venue layout builder showing a customized layout with sections listed, an "Add Section" button, and the "Save as Template" option
What if your venue is completely unique and none of the templates come close? TikkBay is building a full drag-and-drop visual venue builder that will let you design your layout from a blank canvas. You will be able to place sections anywhere, draw curved seating, and arrange your venue map exactly as your space looks in real life.
For now, the best approach is to pick the closest template and customize it using the tools described above - adding, removing, and modifying sections until the layout matches your venue or reach out to us to create your unique venue layout map. Between the 7 templates and the full customization options, you can create a layout for virtually any seating arrangement.
Every section in your venue layout uses one of three pricing modes. This determines how the seat price relates to the ticket price. Understanding these modes is key to setting up your event correctly.
The seat price is added on top of the ticket type price. This is the most common mode and the default for all templates.
Example: You have a "Regular" ticket priced at N5,000. The "Orchestra Front" section has a surcharge of N10,000. An attendee who picks a seat in Orchestra Front pays N5,000 (ticket) + N10,000 (seat surcharge) = N15,000 total. An attendee in the "Balcony" section with a N2,000 surcharge pays N5,000 + N2,000 = N7,000.
Use surcharge mode when you want a base ticket price with premium add-ons for better seats.
The seat price is replaced with the ticket type price entirely. The seat price is ignored - the attendee pays only the ticket type price and can only pick seating sections that are tied to their ticket type.
Example: You create a "VIP" ticket at N25,000 and a "Regular" ticket at N5,000. You then link the "VIP Front" section to the VIP ticket type and the "General Seating" section to the Regular ticket type. An attendee who buys a VIP ticket pays N25,000 and gets to pick any available seat in the VIP Front section. An attendee who buys a Regular ticket pays N5,000 and picks from General Seating. The section's base price has no effect on what anyone pays - the ticket type price is what matters.
Use included mode when you want the ticket type to control both the price and which sections of the venue the attendee can access. This keeps things clean - attendees buy a ticket tier, then choose their seat within the section assigned to that tier.
The seat is the ticket. No separate ticket type is required. The seat price is the complete price, and the seat functions independently.
Example: A free community event has general admission at N0. But you set up a "Premium Front Row" section in standalone mode at N5,000. Attendees can attend for free with general admission or pay N5,000 to reserve a premium front-row seat. This is powerful for events that want to offer both free and paid options.
Use standalone mode when you want seats to be sold independently of ticket types, especially for hybrid free/paid events.
Once you have an active venue layout, connecting it to an event takes two steps. On the event edit page, toggle on "Has Reserved Seating." Then select your venue layout from the drop-down. Only active layouts belonging to your organizer account appear here.
That is it. Save the event, and the seat map becomes part of the checkout experience.
If you are using surcharge or included pricing mode, you should also link ticket types to your venue sections. This tells TikkBay which ticket tier corresponds to which section. You do this in the venue layout builder when editing a section - there is a "Ticket Type" drop-down that lists all ticket types across your events.
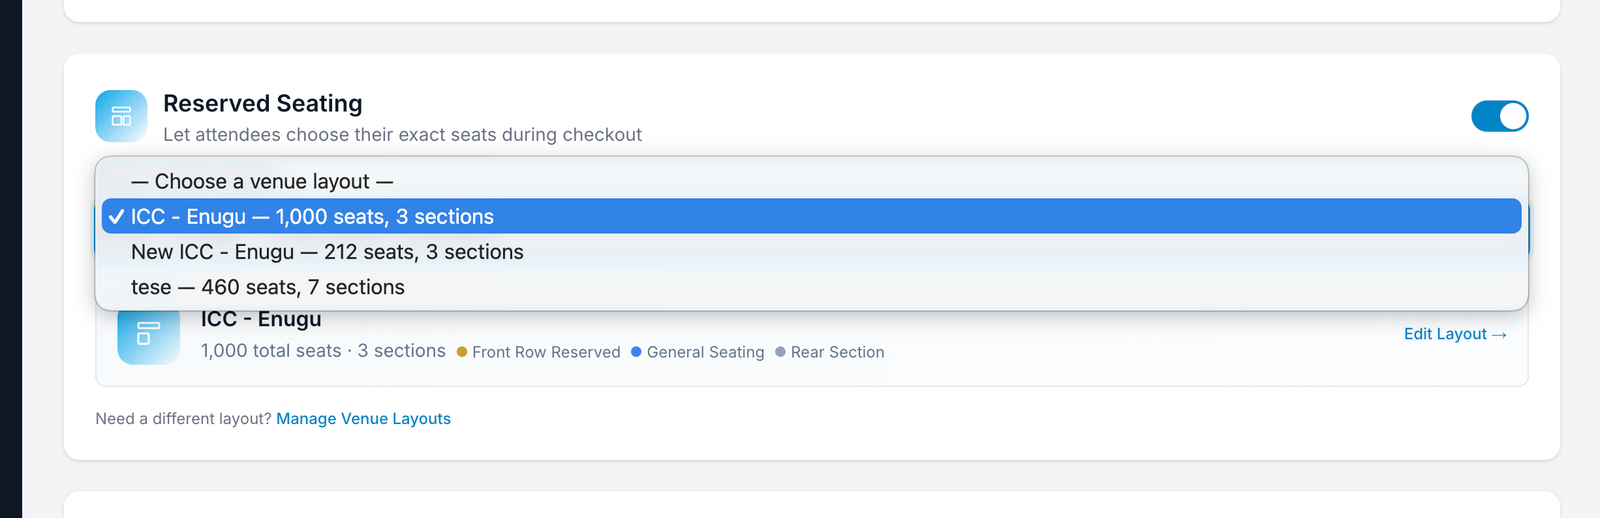
The event edit page showing the "Has Reserved Seating" toggle turned on and the venue layout drop-down with an active layout selected
This is where the magic happens for your attendees. When someone visits your event page and clicks to buy tickets for an event with reserved seating, they see an interactive seat map after selecting a ticket.
The seat map displays your entire venue layout with color-coded sections. Each section is labelled, and attendees can see which areas are premium, standard, or economy based on color and price. Individual seats are shown as clickable dots or icons.
Available seats appear in the section's color (e.g. gold for VIP, blue for standard). Held seats - temporarily locked by another shopper - appear greyed out. Sold seats appear as unavailable. Blocked seats are hidden from the map entirely. Wheelchair-accessible seats are marked with an accessibility indicator.
When an attendee clicks on an available seat, it gets selected and highlighted. They can select multiple seats if their ticket allows for multiple attendees. The checkout sidebar updates in real time showing the selected seats, section names, row and seat numbers (e.g. "Orchestra Front, Row A, Seat 7"), and the calculated price.

The interactive seat map as seen by an attendee at checkout, showing color-coded sections, some available seats, some sold seats, and one selected seats
When an attendee selects a seat and begins checkout, TikkBay places a temporary hold on that seat. The default hold duration is 8 minutes - enough time to complete the checkout form and pay.
While a seat is held, no one else can select or book it. If the attendee does not complete their purchase within the hold window, the seat is automatically released and becomes available again. This prevents the frustrating scenario where two people think they have booked the same seat.
TikkBay also provides a lightweight polling system that the seat map uses to refresh availability every 2 to 5 seconds. So if an attendee is browsing the seat map while someone else completes a purchase, they see the sold seats update in near real time without refreshing the page.
Once your event is published and tickets are selling, there are some important rules to keep in mind.
You cannot apply a new template to a layout attached to a published event. This protects attendees who have already purchased specific seats. You also cannot regenerate seats in a section if any seats are currently held or sold - you would need to release or cancel those bookings first. And you cannot delete a layout attached to a published event.
However, you can still update section names, colors, and prices. You can block or unblock individual seats. And you can adjust price overrides on specific seats. These changes apply immediately.
These safeguards exist to protect your attendees. If someone paid for "Orchestra Front, Row A, Seat 7," that seat belongs to them.
Here are some real-world setups to show how the pieces fit together.
Use the Concert Hall template (~450 seats). Create a "Regular" ticket at N5,000. Set VIP Pit surcharge to N20,000, Floor Center surcharge to N10,000, Floor Left/Right surcharge to N5,000, and Rear Elevated surcharge to N0. The result: VIP Pit attendees pay N25,000 total. Floor Center pays N15,000. Floor sides pay N10,000. Rear pays N5,000 (ticket only, no seat surcharge). Everyone gets an assigned seat.
Use the Conference template (~200 seats). Create a "General" ticket at N10,000. Set Front Row Reserved surcharge to N15,000, General Seating surcharge to N0, and Rear Section surcharge to N0. Block the first 4 seats in the front row for speakers. The result: front-row attendees pay N25,000 for proximity to the stage. Everyone else pays N10,000. Blocked seats are reserved for speakers and do not appear on the seat map.
Create a free ticket (N0). Pick the closest template and customize it into two sections: "General" in surcharge mode at N0, and "Front Row Reserved" in standalone mode at N5,000. The result: the service is free for everyone. But members who want a guaranteed front-row seat can reserve one for N5,000. This works because standalone mode does not depend on the ticket price.
Use the Banquet template (~180 seats). Set all sections to included mode. Head Table at GHS 5,000, Premium Tables at GHS 3,000, Standard Tables at GHS 1,500, Rear Seating at GHS 800. The result: each section has its own all-inclusive price. No separate ticket type pricing to confuse guests. Clean, simple.
Reserved seating turns your event from a free-for-all into a premium, organized experience. It lets you charge more for better seats, eliminates door-time chaos, and gives every attendee confidence that their spot is guaranteed.
TikkBay is the only event ticketing platform in Nigeria that gives you a full venue layout system with interactive seat selection at checkout - and it works on your attendees' phones, tablets, and laptops.
Head over to tikkbay.com, login, create your venue layout, and start selling reserved seats today. Your attendees will thank you.
And if you need a hand setting up your venue layout, remember that TikkBay offers an Assisted Setup service. The team will build your layout for you based on your venue's floor plan. Just reach out through the platform.


A global event discovery and ticketing platform. Find something worth dressing up for.
We use cookies to enhance your experience, analyse traffic, and for marketing. You can choose which categories to allow. Read our Privacy Policy.
TikkBay Support
Usually responds instantly
Create a Support Ticket
Powered by Plusky IT Solutions
Need help? We're here!
Ask about tickets, events, payouts, and more. Click to chat.